Discover Personalized Search: Tailor-Made Experiences with ReactiveSearch and OpenSearch
A deep-dive into crafting relevant search experiences with ReactiveSearch pipelines - a V8 engine based blazing fast JavaScript runtime
CEO @reactivesearch, search engine dx
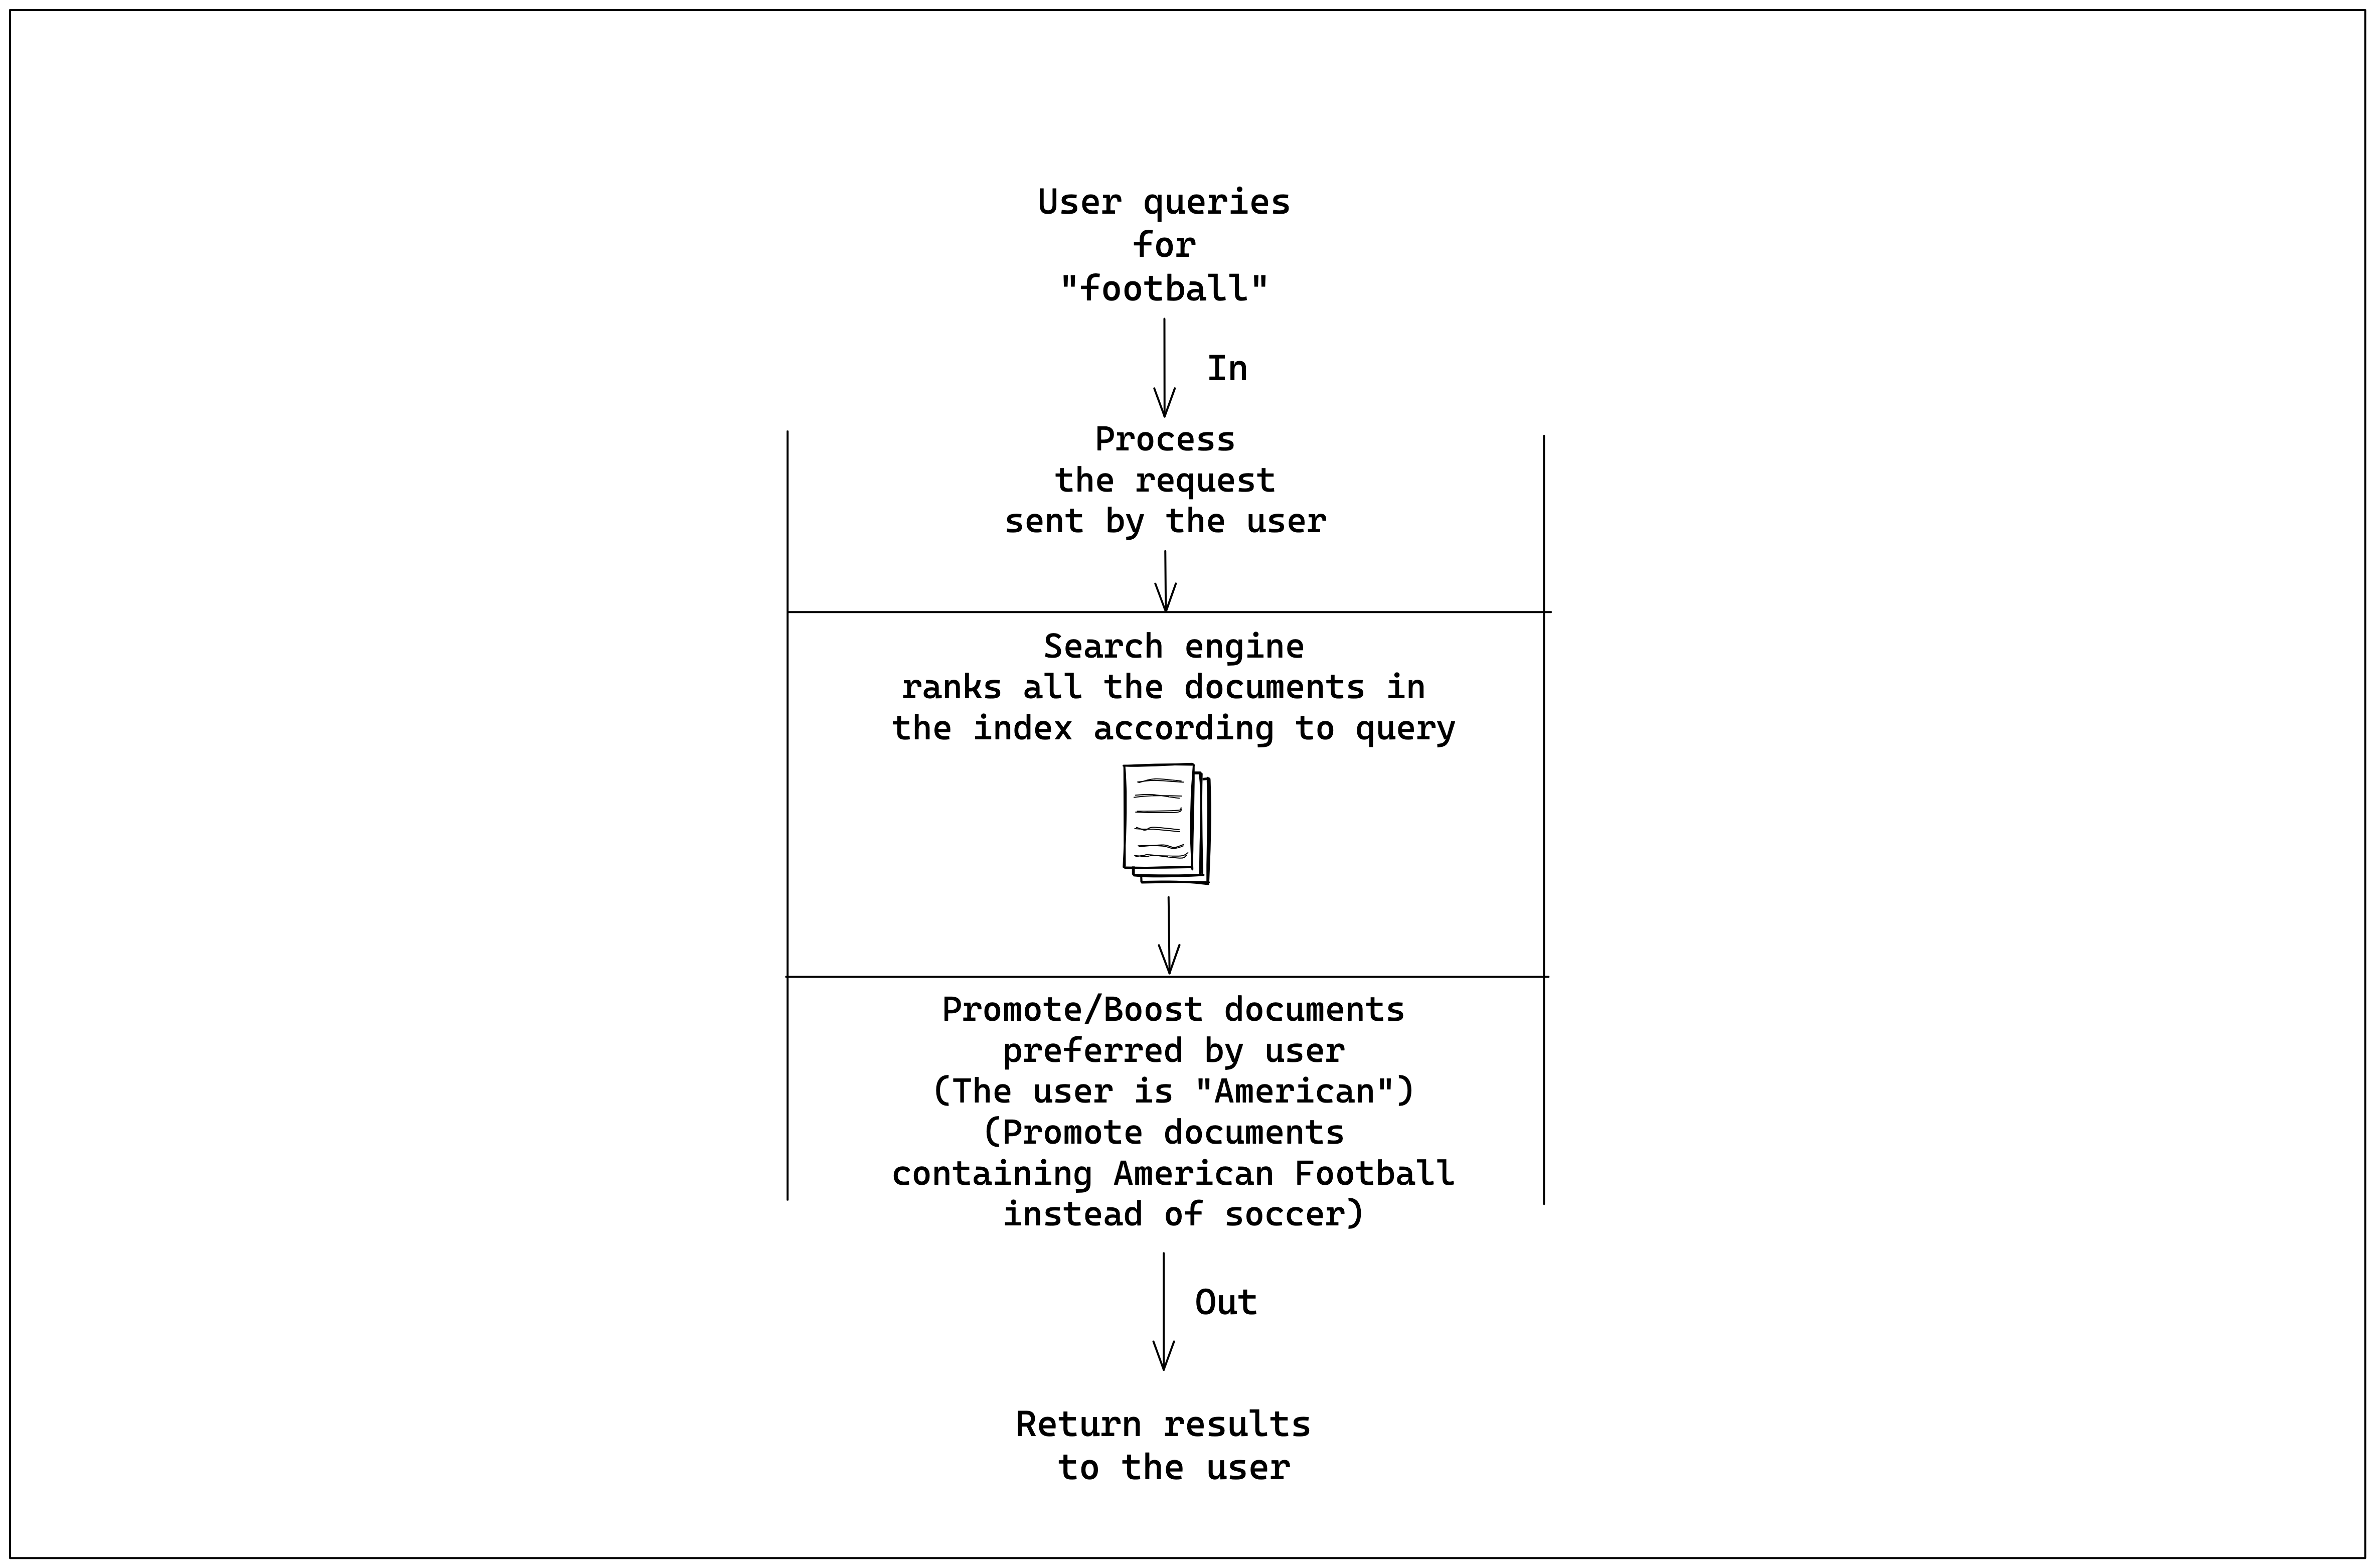
Personalized search is the key to delivering tailored experiences to users by offering relevant results based on their interests and past behavior. Social media platforms like YouTube, Twitter, or TikTok provide personalized feeds that cater to users' preferences. For instance, if two users search for "football," the fan of American football and the fan of soccer will see different results, thanks to personalized search taking their search history and behavior into account.
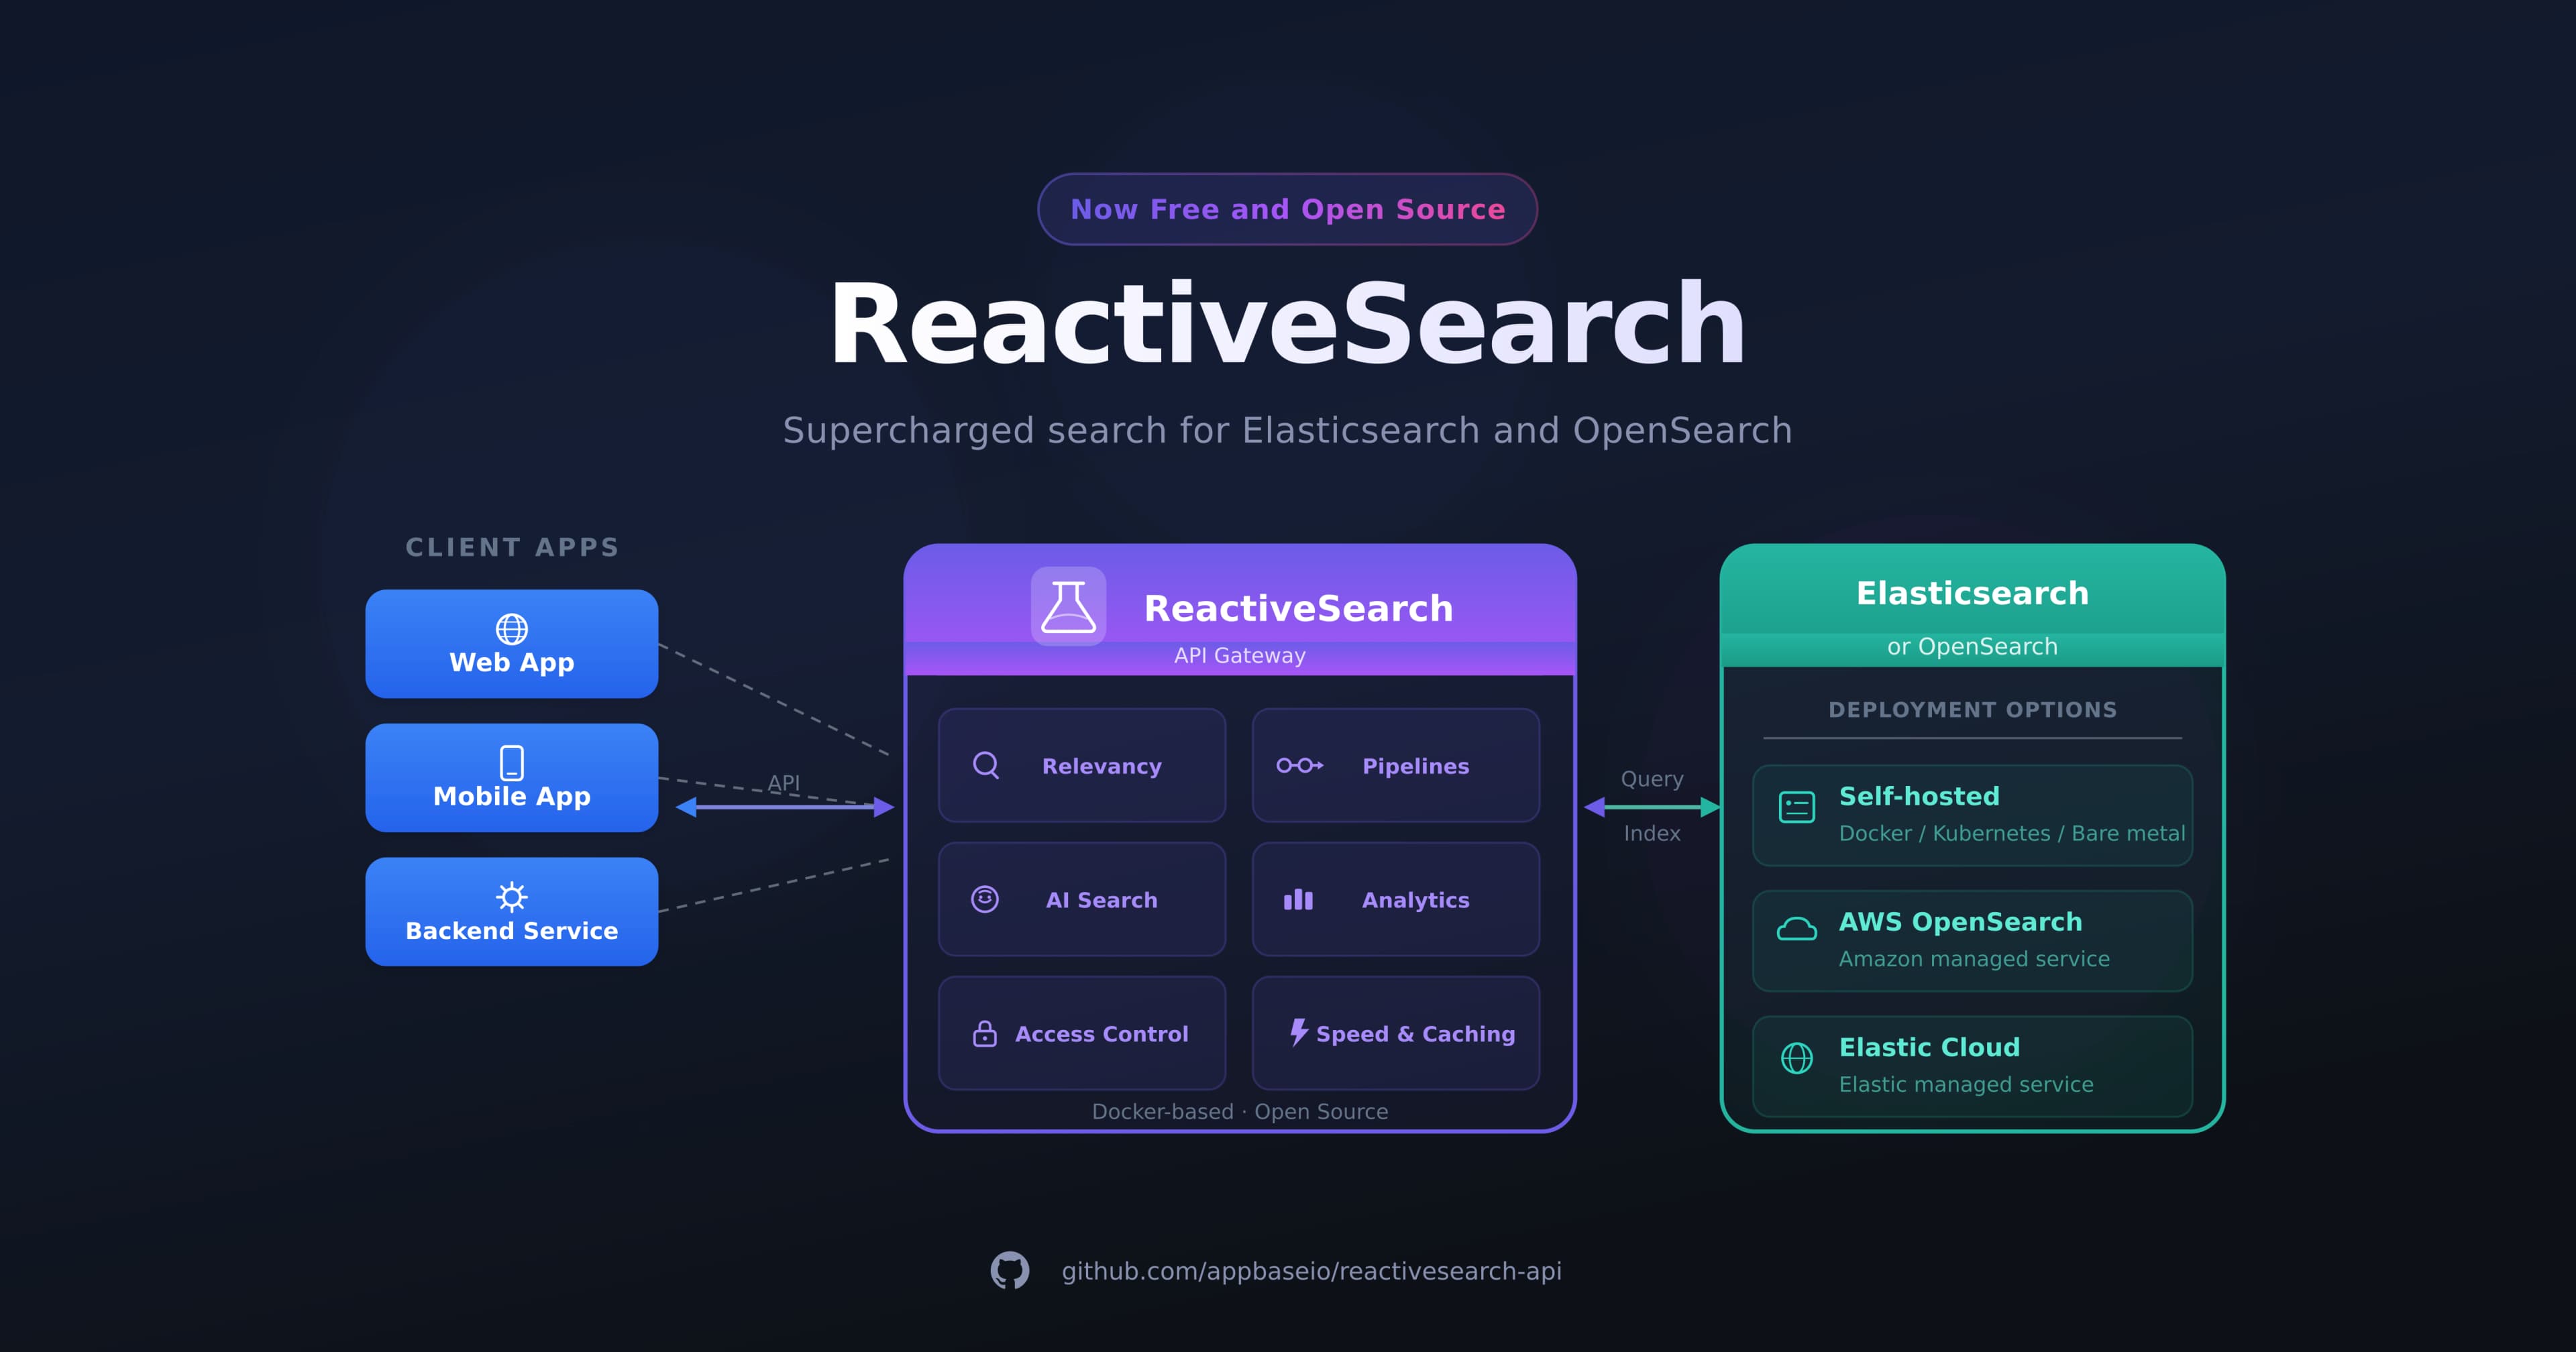
OpenSearch is an open-source search engine that enables developers to build custom search experiences. In this post, we will explore how ReactiveSearch and OpenSearch can help you craft personalized search experiences.
Let's explore some popular applications of personalized search and how user preferences come into play:
Crafting algorithmic feeds based on browsing history: Platforms like YouTube and TikTok utilize personalized search to generate algorithmic feeds of videos that cater to users' interests. By analyzing watch history, likes, comments, shares, and other interactions, these platforms gain insight into users' preferences, serving up relevant and captivating content.
Curating feeds from user-selected topics: Personalized search also shines on news sites, Twitter, Quora, and other platforms where users input their interests or preferred topics. These platforms use this information to create feeds teeming with content that users find relevant and engaging. For instance, a news site might ask users to choose topics such as politics, sports, or entertainment, and then provide news articles on those subjects in their feed.
Some websites blend both approaches, using explicit user-selected topics along with tracking user history, to personalize search results and elevate the user experience. So go ahead, dive into the world of personalized search, and deliver content that resonates with your audience.
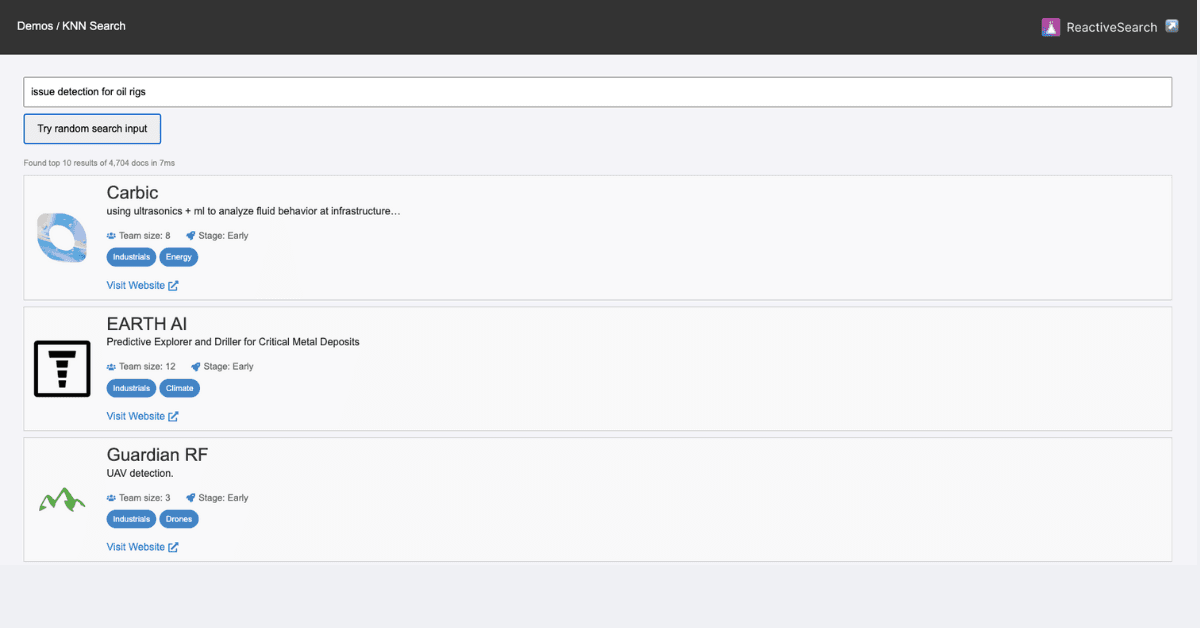
Here's the final personalized feed search UI that you will be building by going through this post:
The Building Blocks
To create a personalized search experience, we'll be using the ReactiveSearch platform and the open-source Apache 2.0 licensed ReactiveSearch UI kit for React.
For this blog post's hosted UI, we have utilized a hosted ReactiveSearch service connected to an OpenSearch backend. ReactiveSearch can also be deployed in self-host mode, as well as connect to other engines: Elasticsearch, Solr, MongoDB and OpenAI are currently supported.
We will use the React frontend UI components library from ReactiveSearch to develop search components like search boxes, filters, and result displays. This approach streamlines the development process and paves the way for a customized search experience.
Building a search pipeline
Traditionally, when a user searches for a specific term, the search engine retrieves documents from the search index, which are then ranked to determine the order in which they appear to the user. However, we want the search engine to "boost" or "promote" certain documents based on end-users' preferences. To achieve this, we will introduce an additional step to promote relevant results before presenting them to the user.
In ReactiveSearch, this multi-step search query process is executed through pipelines. A pipeline is a sequence of search processing stages that query one or more search engines and return results to the user. We will input the user's query into the OpenSearch engine, which will collect and rank all pertinent documents. These documents will then advance to our "boost" step, where we'll enhance user-specific terms to ultimately deliver finely-tuned, personalized results.
We can integrate a step in the pipeline to ensure that only authorized users can access the index. This authorization step can be positioned between the request processing and the search engine's ranking of documents. Pipelines offer incredible versatility, enabling you to incorporate features such as integrating results from ChatGPT, Google's Knowledge Graph, performing vector search, and more. To learn about ReactiveSearch pipelines and their capabilities, see the doc reference here.
Authoring a pipeline using the dashboard
To begin, navigate to dash.reactivesearch.io and select "Pipelines" from the sidebar menu. Next, click on "Create a Pipeline." You'll find several pre-built templates catering to a wide range of use-cases; for our purposes, we'll opt for the "Basic Template." Upon making your selection, a text editor will appear, signaling the completion of this step.
The making of a pipeline
Upon opening the pipeline, you'll notice several components. The first elements are enabled and description, both of which are self-explanatory. Next, the routes property allows us to attach the pipeline to specific API endpoints, which a frontend can make a REST API call to retrieve results. We'll set the path within routes to /query-rules-boost.
Following this, we have envs, which are used to set the pipeline's operational context, including the index, domain settings, and more. We'll set the index to movies-demo-app here.
{
    "enabled": true,
    "description": "Template to create a pipeline",
    "routes": [
        {
            "path": "/query-rules-boost",
            "method": "POST",
            "classify": {
                "category": "reactivesearch"
            }
        }
    ],
    "envs": {
        "index": [
            "movies-demo-app"
        ]
    },
    "stages": [
        {
            "id": "auth",
            "use": "authorization"
        },
        {
            "id": "query",
            "use": "reactivesearchQuery",
            "continueOnError": false
        },
        {
            "id": "os_query",
            "use": "elasticsearchQuery",
            "continueOnError": false
        }
    ]
}
Stages are the building blocks of the pipeline, representing the steps of data transformation, as illustrated in the diagram above. These stages are executed sequentially, constructing the results that are ultimately presented to the user. The "auth" stage verifies whether a user has permission to access the index or perform the intended action. Next, the reactivesearch query stage converts the ReactiveSearch query into an OpenSearch query. Finally, the os_query stage executes a query on the OpenSearch index, collecting the results that are then delivered to the user.
Incorporating a stage to refine search results
Following the diagram, we can introduce an additional stage after retrieving results from the OpenSearch index to enhance specific search outcomes. We can incorporate a stage called boost, you can see its reference in the documentation.
{
    // Same pipeline options as above with additional "boost" stage
    "stages": [
        {
            "id": "auth",
            "use": "authorization"
        },
        {
            "id": "query",
            "use": "reactivesearchQuery",
            "continueOnError": false
        },
        {
            "id": "os_query",
            "use": "elasticsearchQuery",
            "continueOnError": false
        },
        /*
        Score documents containing
        "Harry Potter" better
        */
        {
            "id": "boost-harry-potter",
            "use": "boost",
            "continueOnError": false,
            "inputs": {
                // The field to query in documents
                "dataField": "original_title",
                "value": [
                    "Harry Potter"
                ],
                "boostType": "score",
                "boostMaxDocs": 3 // Boost only top 3 docs
            }
        }
    ]
}
We're setting the stage to boost up to 3 documents that contain the value Harry Potter in the original_title index field. We start with a very specific value to test out the personalization in action.
The dashboard provides a realtime validation testing view where we can test the above pipeline to confirm that we indeed get the top 3 documents of the hits containing Harry Potter in their original_title field.
Building a search UI
With our pipeline configured, it's time to witness it in action. We'll use the React flavor of the ReactiveSearch library to develop the UI. However, you can use the ReactiveSearch dashboard's no-code UI builder, or Vue.JS, vanilla JS, React Native or Flutter libraries to do this. See the choosing UI library section.
npx and go!
We will use create-react-app to get the boilerplate code. Execute the following command in the terminal to create a React app named "feed-search":
npx create-react-app feed-search
cd feed-search
yarn add @appbaseio/reactivesearch
code .   # Fire up your code editor
@appbaseio/reactivesearch is ReactiveSearch's React npm package.
As you open the code editor, notice the src/App.js file, we will be editing this file primarily to build the search UI.
Connecting to the pipeline
Let's connect the pipeline using the ReactiveBase component. Each Reactivesearch UI has a ReactiveBase component as the connector component, where you configure the index and cluster URL. Here, we do this by specifying the endpoint property.
// src/App.js
import "./App.css";
import {
  ReactiveBase
} from "@appbaseio/reactivesearch";

function App() {
  return (
    <>
      <ReactiveBase
        endpoint={{
          url: "https://a03a1cb71321:75b6603d-9456-4a5a-af6b-a487b309eb61@appbase-demo-ansible-abxiydt-arc.searchbase.io/query-rules-boost",
          method: "POST",
        }}
        reactivesearchAPIConfig={{
          recordAnalytics: true,
        }}
      >
      </ReactiveBase>
    </>
  );
}

export default App;
Now we can add some more components like a SearchBox which shows a search bar where a user inputs their search query. We can also add a ReactiveList to display the results returned from the pipeline. You can find more information in the docs for SearchBox and ReactiveList.
import "./App.css";
import {
  ReactiveBase,
  ReactiveList,
  ResultCard,
  SearchBox,
} from "@appbaseio/reactivesearch";

function App() {
  return (
    <>
      <ReactiveBase
        endpoint={{
          url: "https://a03a1cb71321:75b6603d-9456-4a5a-af6b-a487b309eb61@appbase-demo-ansible-abxiydt-arc.searchbase.io/query-rules-boost-static",
          method: "POST",
        }}
        reactivesearchAPIConfig={{
          recordAnalytics: false,
        }}
      >
        <div className="row mt-4 p-3">
          <SearchBox
            dataField={["original_title"]}
            componentId="BookSensor"
            highlight
            URLParams
            size={5}
            enablePredictiveSuggestions
            showClear
            renderNoSuggestion={() => "No suggestions found."}
          />
          <ReactiveList
            componentId="SearchResult"
            dataField="original_title"
            size={12}
            className="result-list-container"
            pagination
            react={{
              and: "BookSensor",
            }}
            render={({ data }) => {
              // Render results returned from the pipeline
            }}
          />
        </div>
      </ReactiveBase>
    </>
  );
}

export default App;
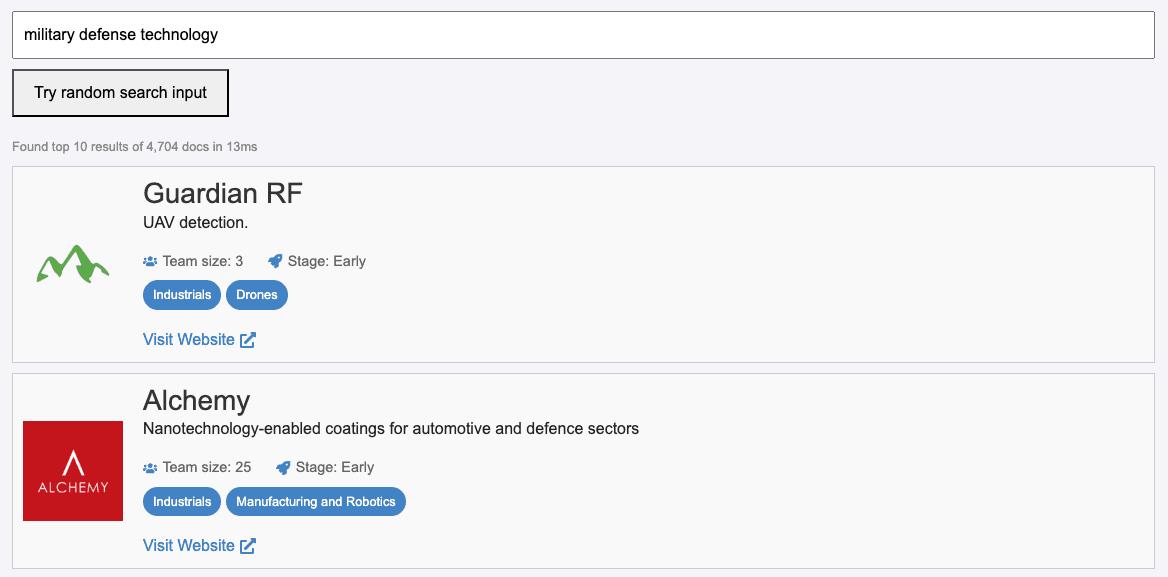
You can look at the final UI below. Observe that we boost 3 "Harry Potter" documents when the search query is empty.
Getting user preferences
We aim to promote specific search results dynamically based on an individual's preferences. This can be achieved by tracking browser history and boosting search results based on recent searches. In this case, we'll allow users to explicitly select the topics they're interested in using a straightforward tag-based selection. Users can choose up to three movie genres, which the search engine will then prioritize in the search results.
To accomplish this, we will create a component inside a file called TagSelector.js. This will feature a select input, enabling users to choose their preferred genres. Additionally, we'll need to incorporate the selected options into our request payload. This data will then be utilized within the pipeline to enhance search results. We can achieve this by using the transformRequest prop of ReactiveBase, which modifies the search request before making a call to the pipeline API.
import "./App.css";
import {
  ReactiveBase,
  ReactiveList,
  ResultCard,
  SearchBox,
  SelectedFilters,
} from "@appbaseio/reactivesearch";
import Navbar from "./Navbar";
import { useEffect, useState } from "react";
import TagSelector from "./TagSelector";

import styles from "./App.module.css";

function App() {
  const [options, setOptions] = useState(["Comedy"]);
  const [isLoading, setIsLoading] = useState(false);

  useEffect(() => {
    if (options) {
      setIsLoading(true);
      setTimeout(() => {
        setIsLoading(false);
      }, 1000);
    }
  }, [options]);

  return (
    <>
      <Navbar />
      <div className="p-3">
        <div className="row">
          <div className={styles.userPreference}>User Preference:</div>
          <div className="col">
            <TagSelector options={options} setOptions={setOptions} />
          </div>
        </div>
      </div>
      {isLoading ? (
        <div className="row mt-4 p-3">Resetting topics...</div>
      ) : (
        <ReactiveBase
          {...samePropsAsBefore}
          transformRequest={(req) => {
            const body = JSON.parse(req.body);
            body.customData = options;
            const newReq = { ...req, body: JSON.stringify(body) };
            return newReq;
          }}
        >
          {/*
              Search and other UI components
          */}
        </ReactiveBase>
      )}
    </>
  );
}

export default App;
If you try out the live search UI, the request body payload should look like below:
POST /query-rules-boost
{
    customData: ["Comedy", "Horror"] // user selected options
}
Incorporating Preferences within the Pipeline
Accessing Context
With data from the frontend now structured within the request body, we need to access it inside the pipeline using context.
Each pipeline operates within a specific context. This context can be accessed within the stages to dynamically modify their input. First, however, we must parse the request and incorporate the selected options into the context. To achieve this, we'll create a script called promoteParams.js, which will be added as a stage prior to our boost stage. This script introduces an additionalParams property to the context object, which can be accessed within the stage as {{additionalParams}}.
// promoteParams.js
function handleRequest() {
    const requestBody = JSON.parse(context.request.body);
    const customData = (requestBody && requestBody.customData) || [];

    return {
        additionalParams: {
            paramOne: customData[0] || '',
            paramTwo: customData[1] || '',
            paramThree: customData[2] || '',
        },
    };
}
You can add the script as a stage using the dashboard. First, reference the script inside the pipeline as a stage and then add a file named promoteParams.js with the above content. Add the script before the boost stages.
{
    // Same pipeline options as above with additional script stage
    "stages": [
        //Other stages same as above
        // Add below stage before the boost stage
        {
            "id": "addPromoteParams",
            "scriptRef": "promoteParams.js"
        },
        {
            "id": "boost-harry-potter",
            "use": "boost",
            "continueOnError": false,
            "inputs": {
                // The field to query in documents
                "dataField": "original_title",
                "value": [
                    "Harry Potter"
                ],
                "boostType": "score",
                "boostMaxDocs": 3 // Boost only top 3 docs
            }
        }
    ]
}
Using Context:
Each pipeline has a context in which it's executing. We can access this context as an input to a stage.
Now we can reference the context inside the boost stages. We also add two more boost stages to handle all three genres.
{
    // Same pipeline options as above with dynamic input from context
    "stages": [
        // Other stages
        {
            "id": "addPromoteParams",
            "scriptRef": "promoteParams.js"
        },
        {
            "id": "boostOne",
            "use": "boost",
            "continueOnError": false,
            "inputs": {
                "dataField": "genres",
                "value": [
                    "{{additionalParams.paramOne}}"
                ],
                "boostType": "score",
                "boostMaxDocs": 3
            }
        },
        {
            "id": "boostTwo",
            "use": "boost",
            "continueOnError": false,
            "inputs": {
                "dataField": "genres",
                "value": [
                    "{{additionalParams.paramTwo}}"
                ],
                "boostType": "score",
                "boostMaxDocs": 3
            }
        },
        {
            "id": "boostThree",
            "use": "boost",
            "continueOnError": false,
            "inputs": {
                "dataField": "genres",
                "value": [
                    "{{additionalParams.paramThree}}"
                ],
                "boostType": "score",
                "boostMaxDocs": 3
            }
        }
    ]
}
Congratulations, we've now updated the pipeline to use the user preferences passed from the frontend search UI. The complete frontend code and live hosting of the search UI is shown below:
Summary
In this post, we explored the concept of personalized search and its implementation using ReactiveSearch and OpenSearch. We learned how to create a pipeline with multiple stages to process and enhance search results based on user preferences. Additionally, we built a search UI using the ReactiveSearch library and a React app, allowing users to explicitly define their interests through a tag-based selection. We also delved into accessing and modifying context within the pipeline stages to dynamically adjust search results. By combining these techniques, we're able to provide users with a customized and engaging search experience.
ReactiveSearch Pipelines offer a V8 engine-based JavaScript runtime (similar to CloudFlare workers) that you can run alongside search engines to craft relevant search experiences for SaaS, Enterprise and E-Commerce use cases.
Additional links to explore more: