The Complete Guide to Building an Emoji Search App With React and Elasticsearch 🎓
Or broadly, how to build sentiment analysis and natural language understanding search applications

Emojis have been making their way into mainstream culture since their introduction in mobile operating systems starting 2010. Remember when Oxford dictionaires named 😂 the word of the year in 2015, or when we got the Emoji movie in 2017!
Or perhaps this moment when Ye tweeted out in support of lonely emojis 🤯
Building Emoji Searcher
So here, we want to showcase the power of emojis by building an app that can recommend similar emojis based on an emoji, text or a combination of text and emojis. And we're also gonna shine a light on the lonely emojis 😢, because yes, emojis are people too and we ❤️ 'em all!
You can try out the live app over here!
Our Tech Stack
We will be using React to build our Emoji searcher UI.
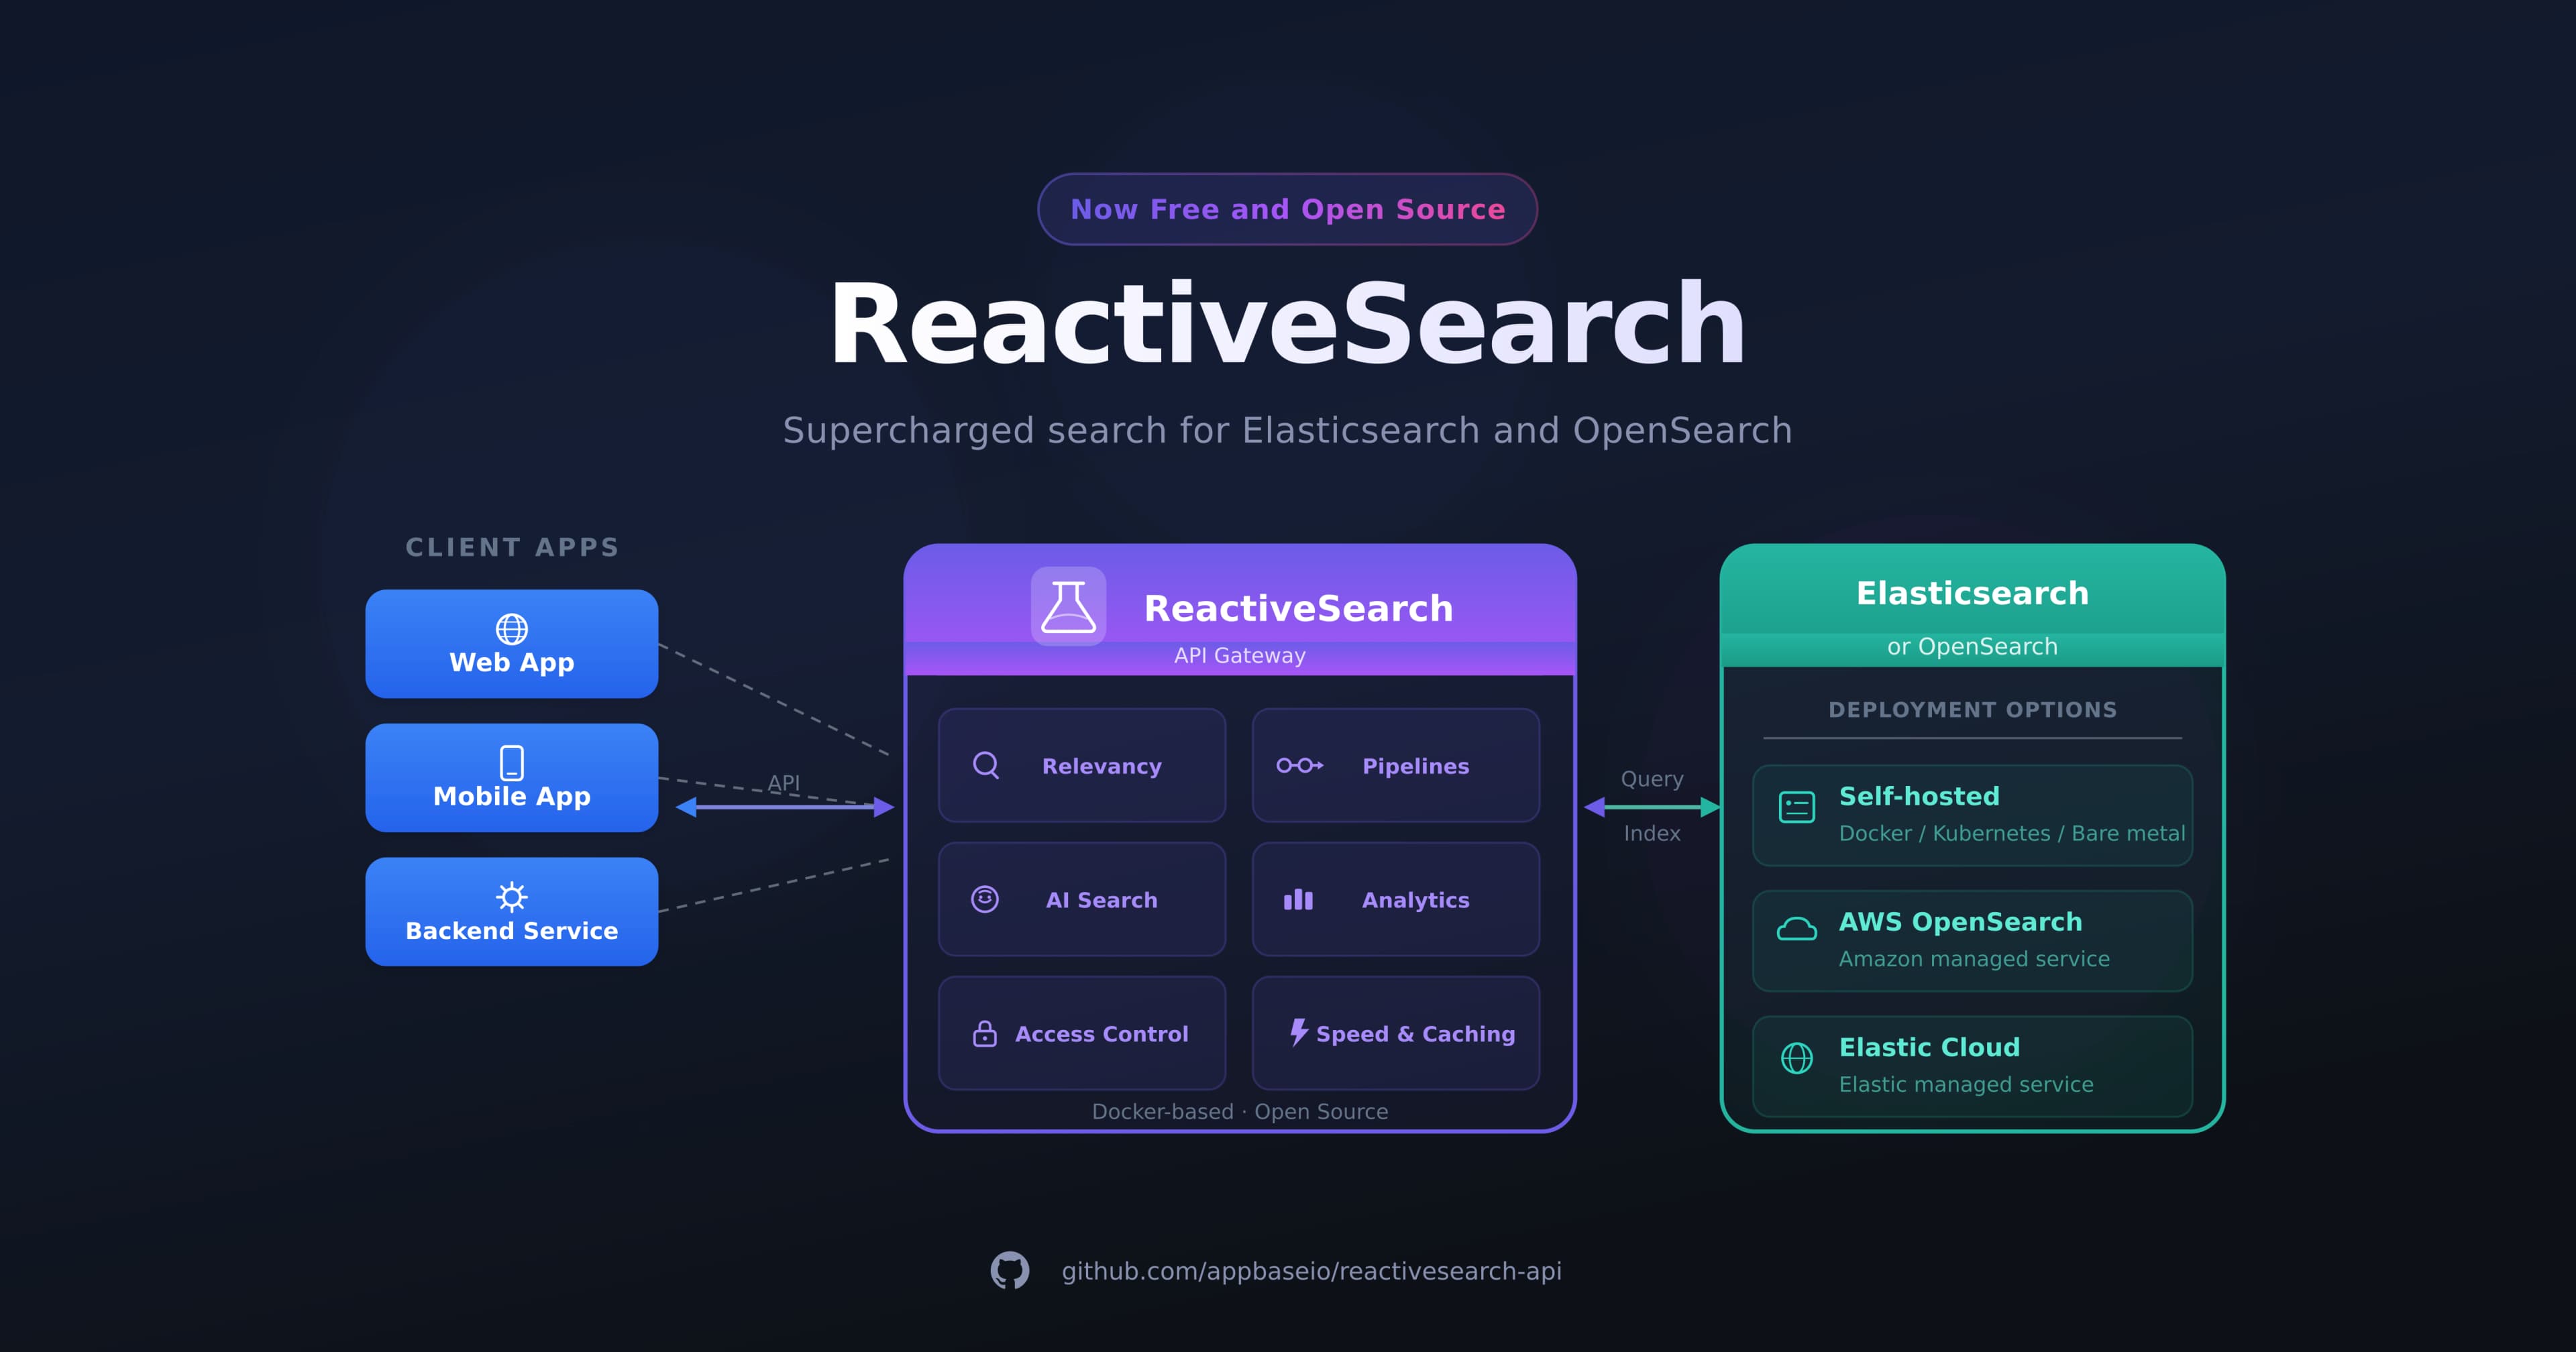
Next, we are using appbase.io to host an Elasticsearch cluster where we've indexed an emoji dataset from emojibase. appbase.io provides a low-code interface for building relevant search apps with Elasticsearch. You can also use another hosted provider or use OpenSearch here.
The emoji recommendations system is built in JavaScript and hosted on appbase.io using ReactiveSearch scripts, think serverless function but optimized for runtime latencies and executed using the V8 engine. However, being JS, you can run this on the client-side as well.
The recommendation system uses a lightweight, heuristics-driven NLP library that performs surprisingly well: compendium-js but can also be replaced with a ANN / DNN based model to do the same.
App Architecture
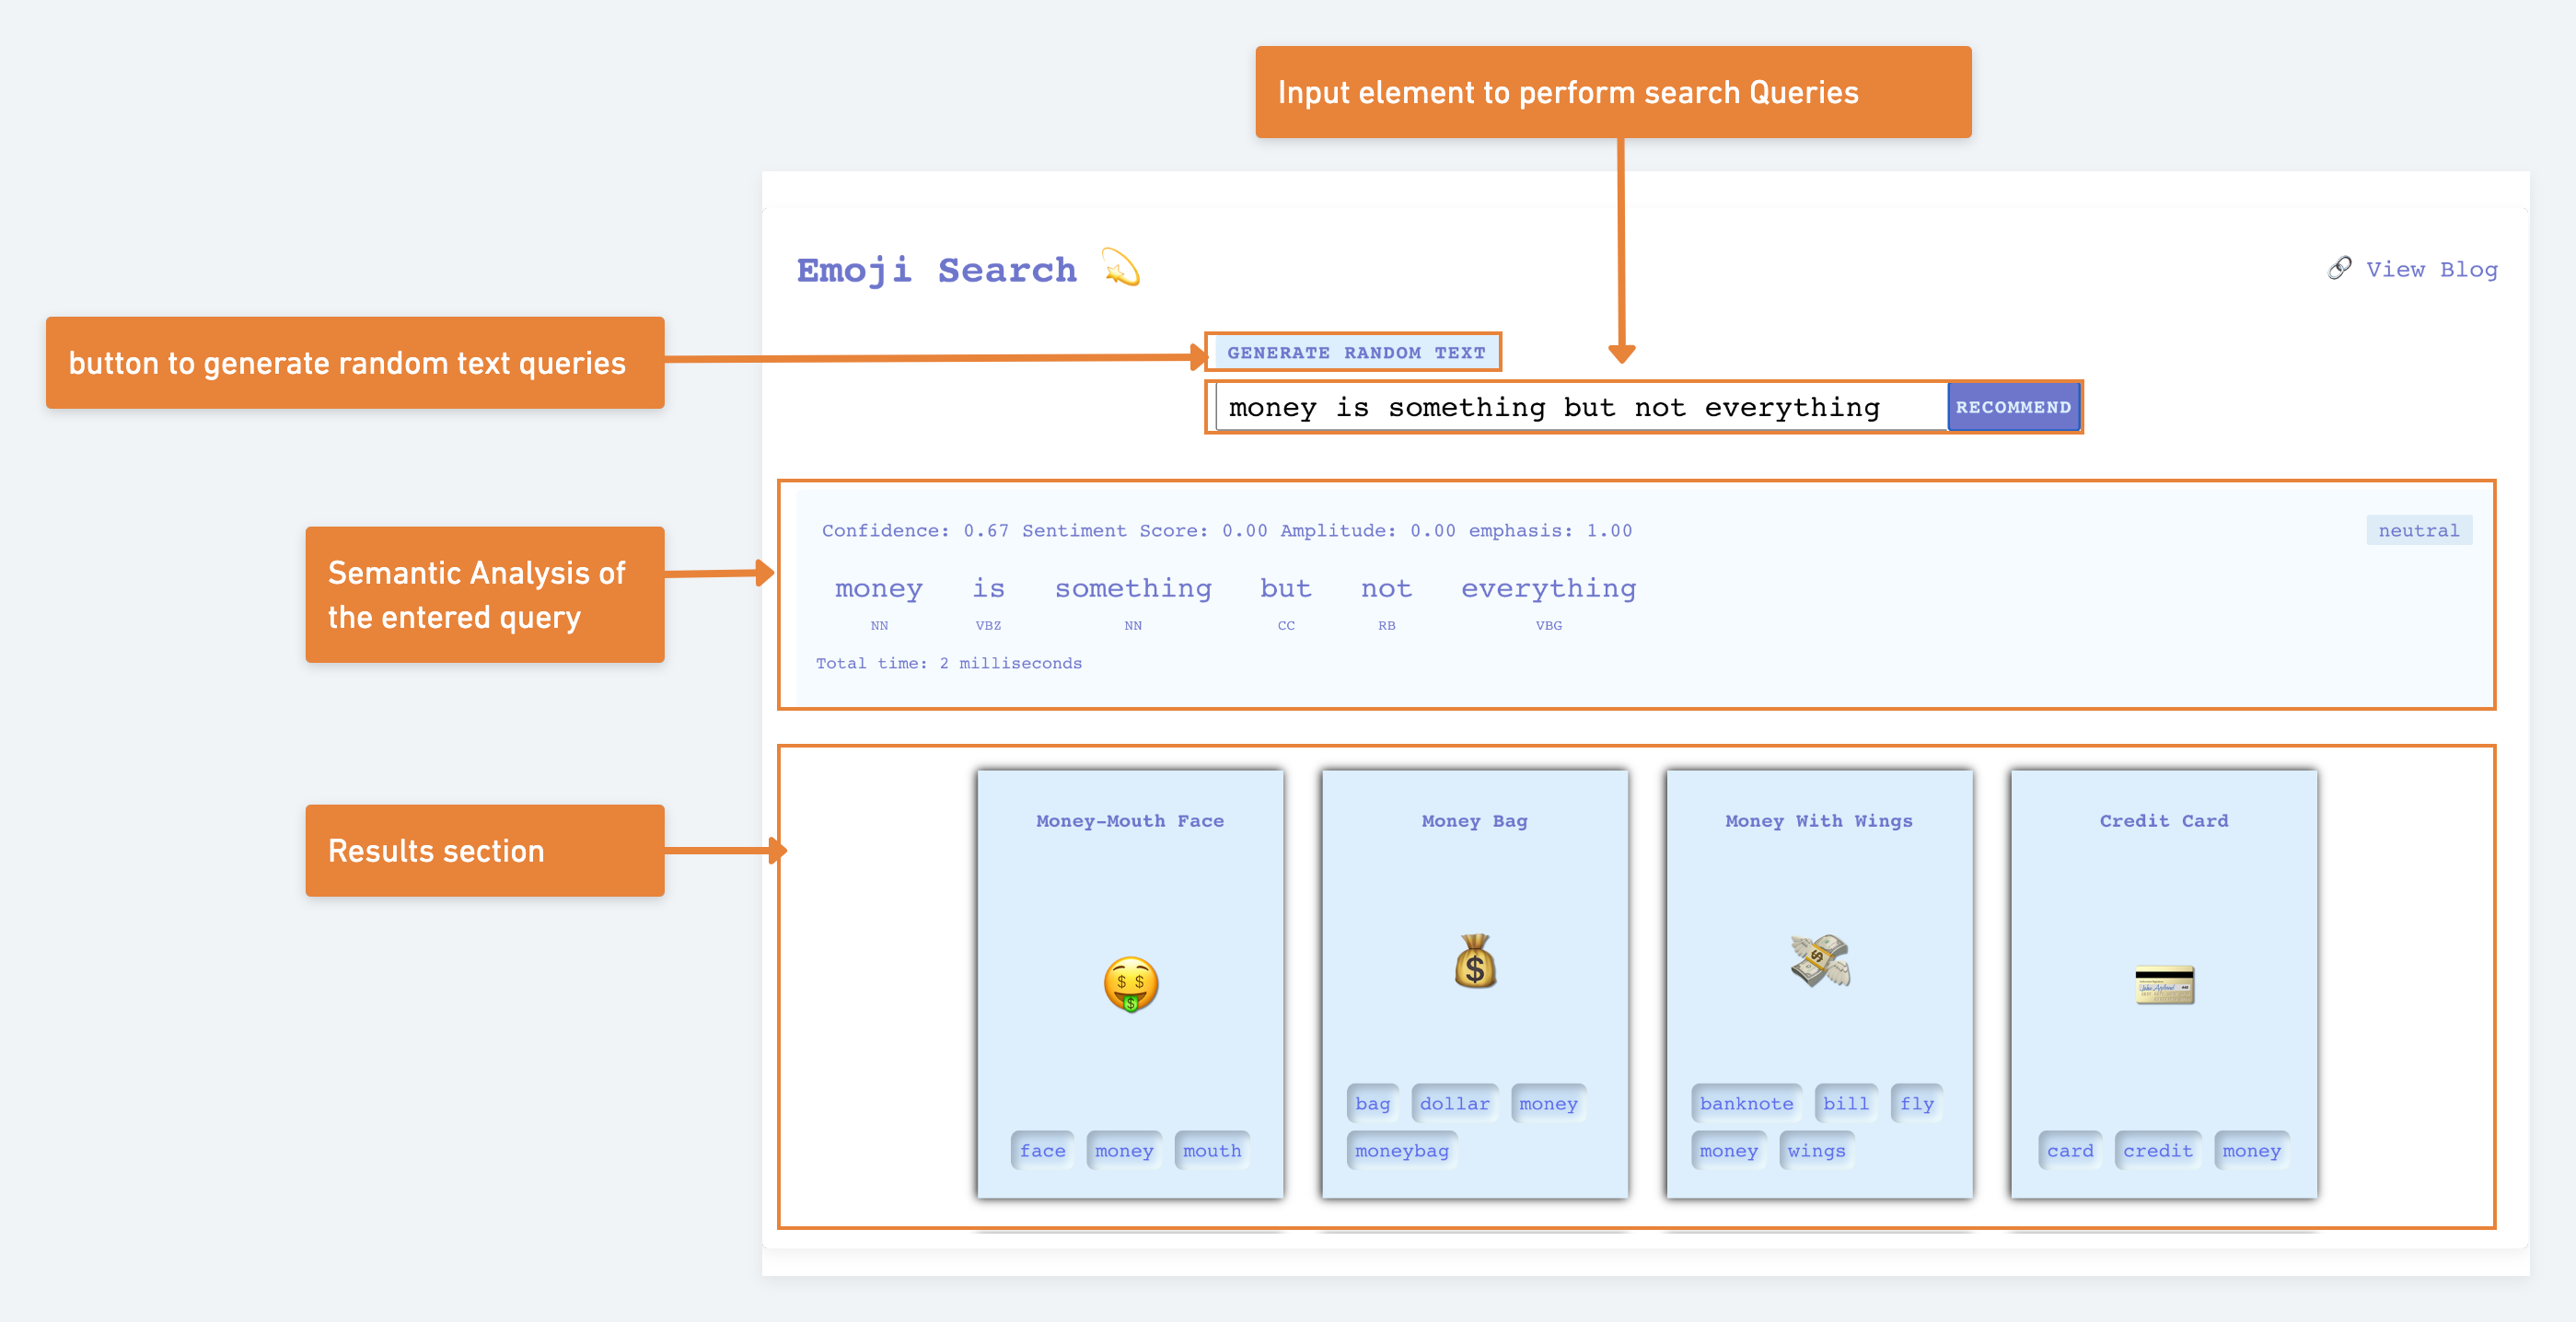
Our application is simple with just three top-level UI components:
- input element for performing text queries
- result component to render the search results
A section to display the sentiment-analysis done on the entered search query
The below diagram should convey how our components sit in our application.
Getting Started
- Our requirement is simple, we would be using the appbase-js library to connect to our dataset and perform search queries.
We can either add appbase-js to an existing app or create a boilerplate app with Create React App (CRA). For this quickstart guide, we will use the CRA.
create-react-app recipe-search && cd recipe-search
OR
Alternatively, you can go to Codesandbox.io and choose the React Template.

We will fetch and install the module using yarn or npm.
yarn add appbase-js
OR
npm install appbase-js
OR
Alternatively, you can directly add the appbase-js dependency to codesandbox.io.
Step 1: Adding the Input element
Let’s edit our root file.
import React, { useState } from "react";
import ReactDOM from "react-dom";
import "./index.css";

const App = () => {
  const [searchText, setSearchText] = useState("");

  return (
    <div className="app-root">
      <div className="input-wrapper">
        <input
          name="search-field"
          type="text"
          onChange={(e) => setSearchText(e.target.value)}
          value={searchText}
          placeholder="Try searching, 'man swimming' "
        />
      </div>
    </div>
  );
};

ReactDOM.render(
  <React.StrictMode>
    <App />
  </React.StrictMode>,
  document.getElementById("root")
);
Additionally, let’s make it functional by connecting to our dataset using appbase-js and perform real time search.
...

// import the appbase-js lib
import appbasejs from "appbase-js";

// instantiating appbase-js required
// fields to connect to the dataset
var appbaseRef = appbasejs({
  url: "https://appbase-demo-ansible-abxiydt-arc.searchbase.io",
  app: "emoji-dataset",
  credentials: "f1da7b624918:3331c67d-3477-4b24-aa89-aefc6ca4683e"
});

const App = () => {
  const [searchText, setSearchText] = useState("");
    // indicates whether api has responded or not
  const [isSearching, setIsSearching] = useState(false);
    // keeping record of the fetched results
    const [results, setResults] = useState(null);

    // makes a call to the backend to fetch results
  const makeApiCall = () => {
    setIsSearching(true);
    const SEARCH_ID = "emoji_search";
    appbaseRef
      .reactiveSearch(
        [
          {
            id: SEARCH_ID,
            size: 10,
            ...(searchText && { value: searchText })
          }
        ],
        {
          enableQueryRules: true
        }
      )
      .then(function (res) {
        setIsSearching(false);
        setResults(res[SEARCH_ID].hits.hits);
      })
      .catch(function (err) {
        console.log("search error: ", err);
      });
  };

  return (
    <div className="app-root">
      <div className="input-wrapper">
        <input
          ...
        />
        <button id="recommend-btn" onClick={makeApiCall}>
          Recommend
        </button>
      </div>
    </div>
  );
};

ReactDOM.render(
...
);
App Preview:
Step 2: Adding the Results component
We would now display the results fetched from the backend.
...
import ResultsRenderer from "./components/ResultRenderer";
import "./index.css";
// import the appbase-js lib
import appbasejs from "appbase-js";
// instantiating appbase-js required
// fields to connect to the dataset
var appbaseRef = appbasejs({    ...    });

const App = () => {
    ...

  return (
    <div className="app-root">
      <div className="input-wrapper">
        ...
      </div>
      <div className="result-wrapper">
        <ResultsRenderer results={results} />
      </div>
    </div>
  );
};

ReactDOM.render(...);
We would need two extra components that would sit in src/components/ directory.
<ResultsRender /><ResultItem /><ResultsRenderer />
import React from "react";
import ResultItem from "../ResultItem";

const ResultsRenderer = ({ results = [] }) => {
  const getResultItems = () => {
    if (!results) {
      return (
        <span id="no-results" role="img" aria-label={"no results"}>
          Try searching, "Love in the air!" 😉
        </span>
      );
    }
    if (Array.isArray(results) && !results.length) {
      return (
        <span id="no-results" role="img" aria-label={"no results"}>
          🤕 Nothing relevant found!!! Try something else.
        </span>
      );
    }
    return results.map((resultItem) => {
      return <ResultItem key={resultItem._id} item={resultItem} />;
    });
  };

  return <div className="results-renderer">{getResultItems()}</div>;
};

export default ResultsRenderer
<ResultItem />import React from "react"; const ResultItem = ({ item: { _source: { emoji, label, tags }, }, }) => { return ( <div className="result-item"> <h4>{label}</h4> <span id="emoji-wrapper" role="img" aria-label={label}> {emoji} </span> <div className="tags"> {tags?.map((tag) => ( <span>{tag}</span> ))} </div> </div> ); }; export default ResultItem;
App Preview:
Step 3: Adding the Sentiment Analysis Section
This step is a combination of 2 sub-steps:
- Adding a script rule to perform sentiment analysis on every query made to the backend.
- The UI section to display the analysed data.
Step 3.1 Adding a script rule to perform Sentiment Analysis.
A ReactiveSearch script is a user defined JavaScript function typically executed during the request or response cycle of a search query or when indexing data.
Note: Conceptually, a script is run in a V8 engine isolate, and it is architecturally similar to how a Cloudflare worker operates.
Scripts run on the same machine that hosts the reactivesearch-api service (and Elasticsearch if it is hosted with appbase.io) and can make use of storage and state persistence using Elasticsearch.
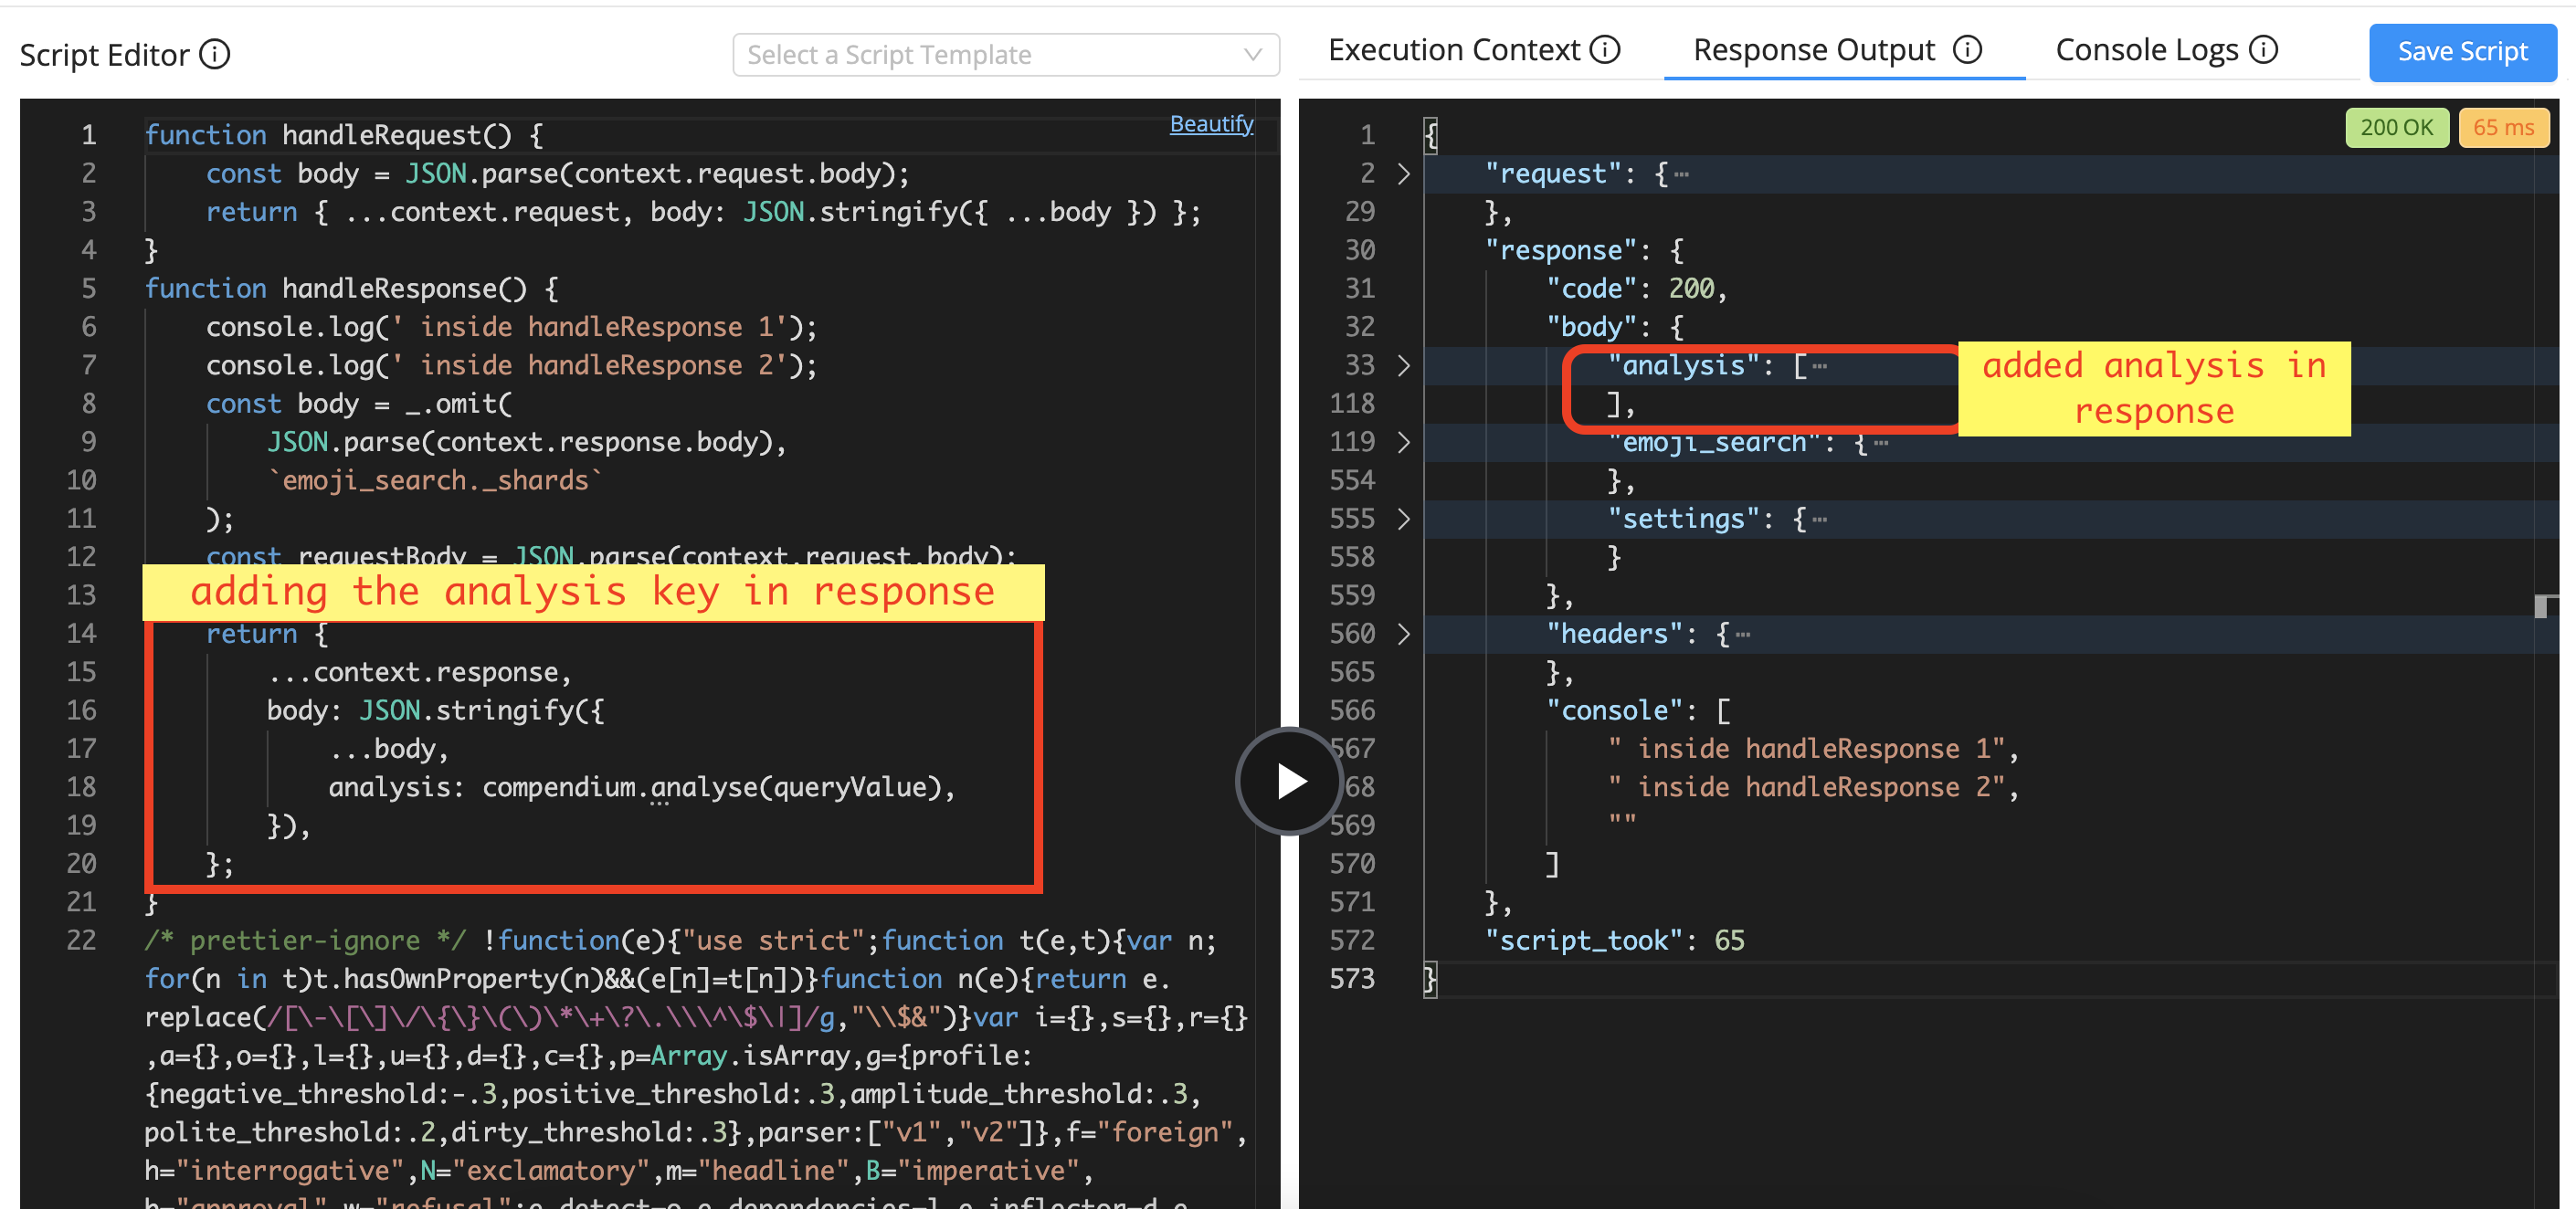
The aim of the script in our case is to perform sentiment analysis using compendium-js on the entered search query and attach the result in the response using an analysis key.
To do so, there are 2 ways, either you can run the cURL request or attach a script query rule using Appbase.io dashboard.
When using cURL, copy the command from the given gist:
https://gist.github.com/mohdashraf010897/cc2e5f5bb0a4d81a95405e23e5dc7ac4
When validating the script rule using Appbase.io dashboard, one can validate the script and see the script in action, something like,
Improving the search relevancy
The script rule applies some logic in order to provide improved accuracy and relevant search experience.
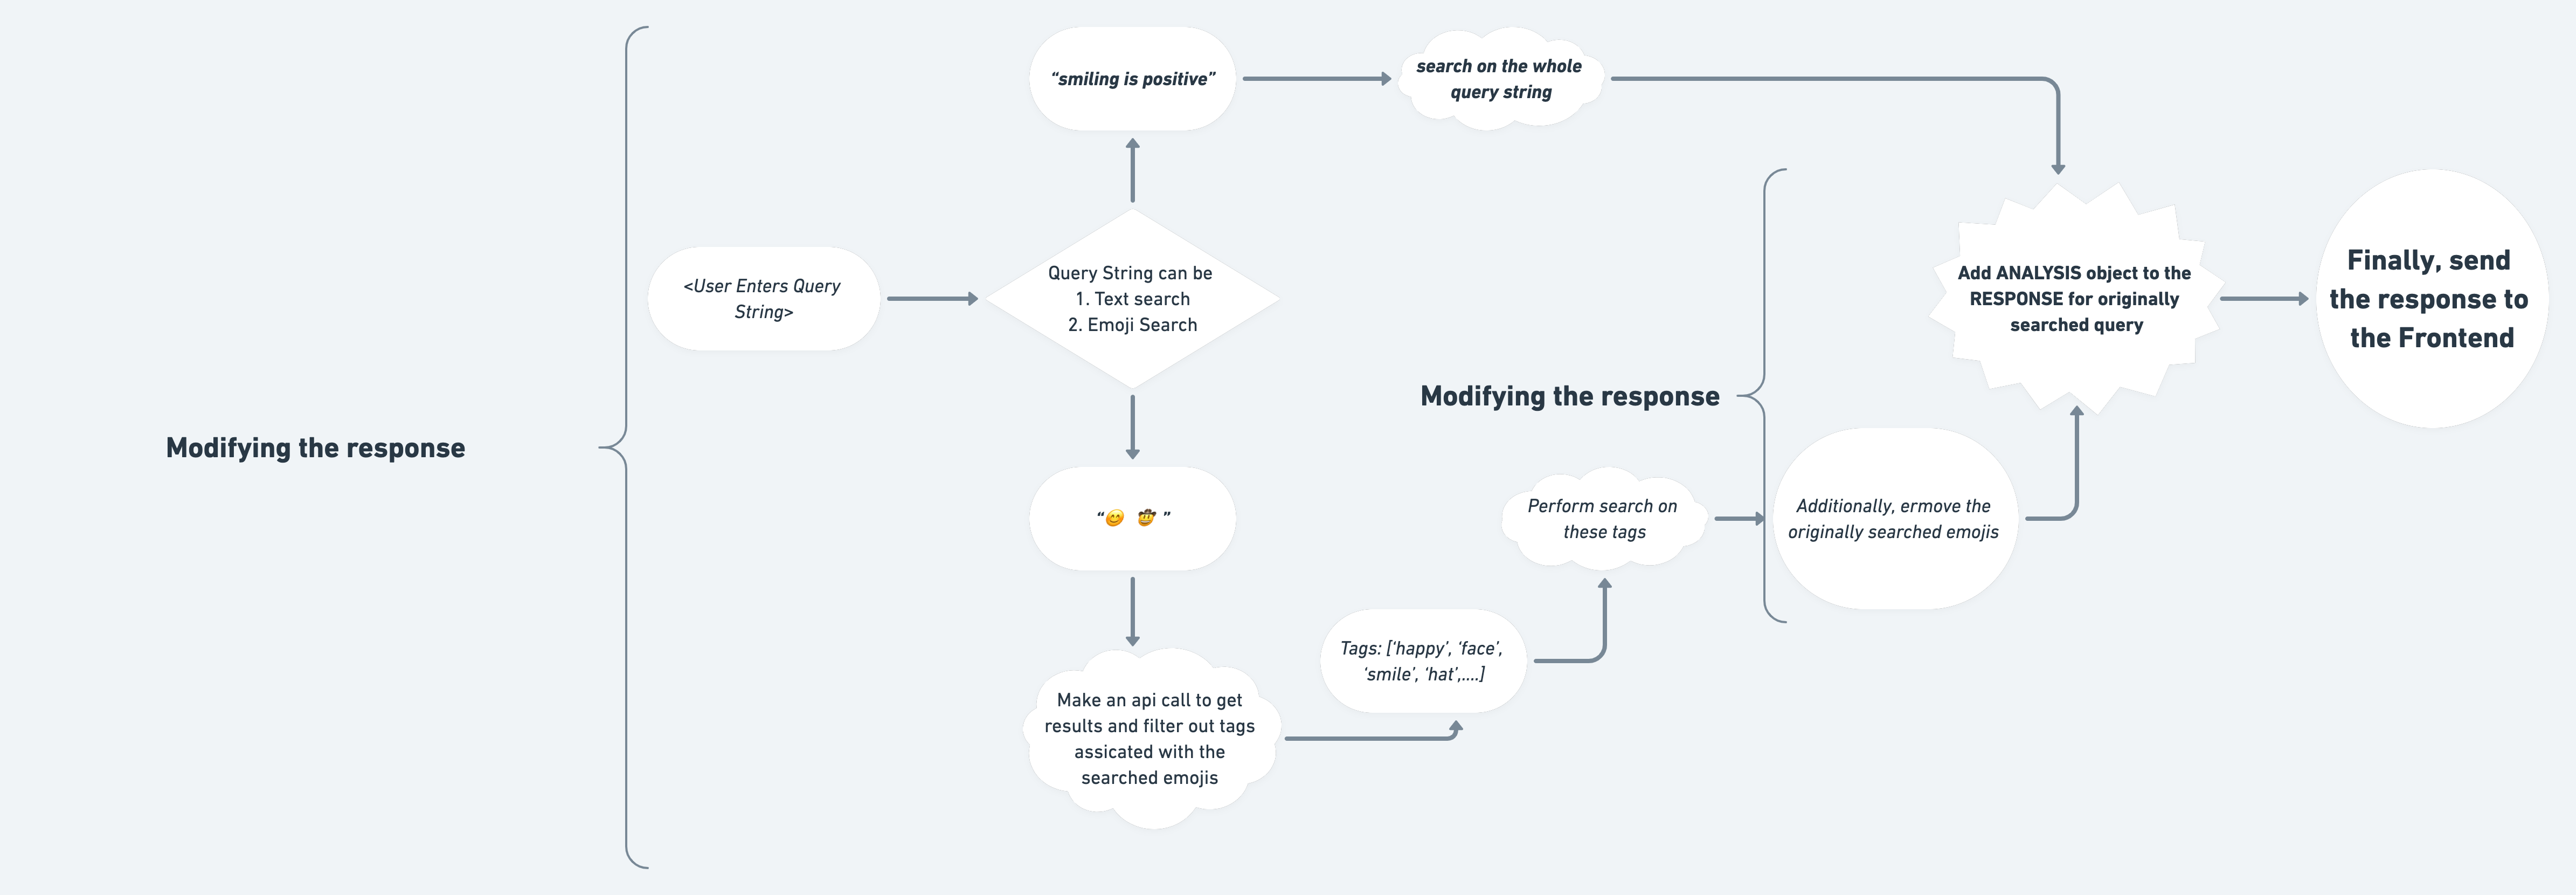
Let’s understand this flowchart:
We have divided the search queries in two parts,
- Text search queries
- Example: “Obama is funny”
- Emoji search queries
- Example: “😊 🤠 ” (only emojis allowed)
As the user hits the backend to search for a query, the script rule attached to the emoji-dataset catches this request and allows us to put in the magic.
There are two methods that help us intervene in the normal api call and modify it.
handleRequest()allows modifying the request.handleResponse()allows modifying the response.Inside handleRequest()
Here, we are first checking whether the search query value is a Text Search or an Emoji Search, type of query. (we have defined a method named as
isEmojiPresent(...)insidehandleRequest()for this purpose.Case 1: Text Search
The text search query is analysed for the nouns, verbs, and sentiment labels (we are using compendium-js package to perform language processing). Thereafter, stopwords like [is, are, be, ...], are filtered out and a queryString is formed to perform search, which is likely to give more relevant results.
For example, say the user searches for “I am fond of eating apples” , the script rule would process this input and finally search for:
“tags:(fond OR eating OR apples) OR label:(fond OR eating OR apples) OR tags:(smile OR joy OR happy OR good OR awesome OR excite OR love) OR label:( smile OR joy OR happy OR good OR awesome OR excite OR love)”
Case 2: Emoji Search
When the user searches directly for an emoji(s), the Script rule is designed to first search for associated results with the originally searched emoji(s), filter out the tags of the returned results and then perform search based on these tags so that we get results which are more relevant.
For example,
For example, say the user searches for “😊 😂” , the script rule would process this input and filter out tags: [”face”, “joy”, “laugh”, “tear”, “blush”, “eye”, “smile”], and finally perform search on “tags:(face OR joy OR laugh OR tear OR blush OR eye OR smile)”.
Inside handleResponse()
For Case 1: Text Search, the method can utilised to attach the sentiment-analysis result for the search query for the Frontend to consume and display the analysis (Check Step 3.2).
For Case 2: Emoji Search, the results are filtered out for the originally searched query. The logic is that the tags we perform search upon would obviously give the originally searched emoji and to avoid duplication/ redundancy we filtered out the originally searched emoji(s).
Step 3.2 Adding the UI to display the analysis data.
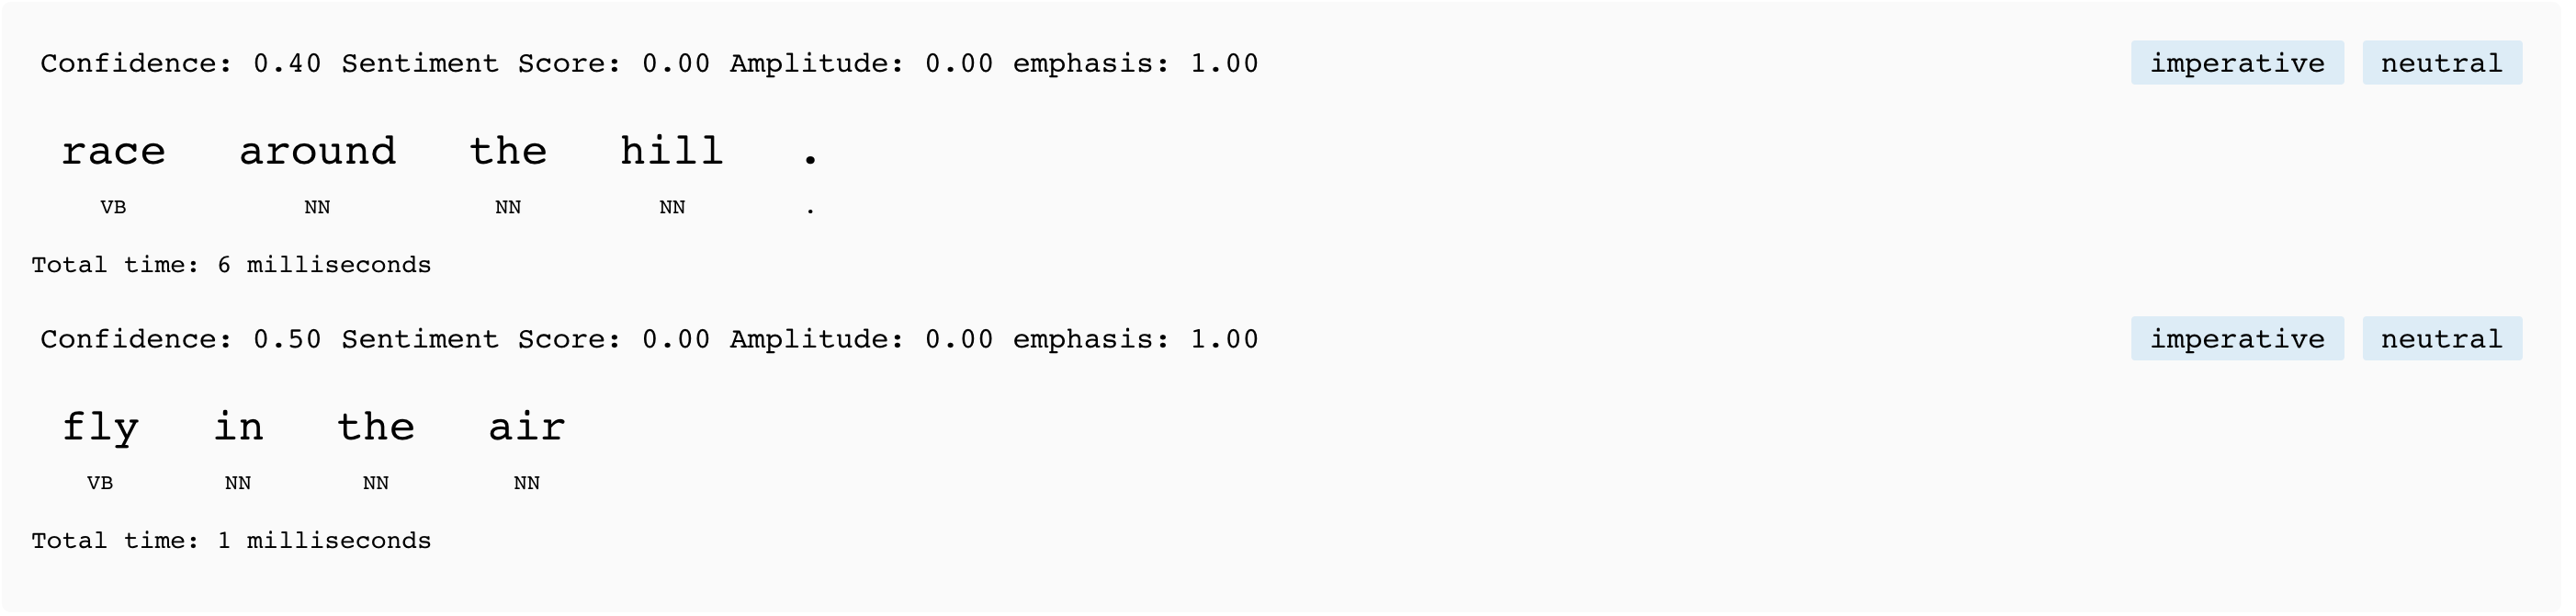
We are now set to display the analysis data in the UI.
Let’s say the sentence is "race around the hill. fly in the air" then the subsequent UI would display the data in the below format.
Let’s code.
...
import SentimentStats from "./components/SentimentStats";
...

const App = () => {
    ...
  const [sentimentData, setSentimentData] = useState([]);
  // holds time taken by script
  const [scriptTime, setScriptTime] = useState(0);

  const makeApiCall = () => {
    ...
    appbaseRef
      .reactiveSearch(
        ...
      )
      .then(function (res) {
        ...
        setSentimentData(res.analysis);
        setScriptTime(res?.settings?.script_took ?? 0);
      })
      .catch(function (err) {
        ...
      });
  };

  return (
    <div className="app-root">
      <div className="input-wrapper">
        ...
      </div>
      <SentimentStats sentimentData={sentimentData} scriptTime={scriptTime} />
      <div className="result-wrapper">
        ...
      </div>
    </div>
  );
};

ReactDOM.render(...);
File: src/index.js
import React from "react";

const SentimentStats = ({ sentimentData, scriptTime }) => {
  if (!Array.isArray(sentimentData) || sentimentData.length === 0) {
    return null;
  }

  return (
    <div className="sentiment-stats">
      {sentimentData?.map((sentimentObject) => (
        <div className="sentiment-sentence">
          <div className="sentiment-sentence__stats">
            <div className="sentiment-sentence__stats--meta">
              <span>
                Confidence: {sentimentObject.stats.confidence.toFixed(2)}
              </span>
              <span>
                Sentiment Score: {sentimentObject.profile.sentiment.toFixed(2)}
              </span>
              <span>
                Amplitude: {sentimentObject.profile.amplitude.toFixed(2)}
              </span>
              <span>
                emphasis: {sentimentObject.profile.emphasis.toFixed(2)}
              </span>
            </div>

            <div className="sentiment-sentence__stats--types">
              {sentimentObject.profile.types.map((type) => (
                <span key={type}>{type}</span>
              ))}
              <span className={sentimentObject.profile.label}>
                {sentimentObject.profile.label}
              </span>
            </div>
          </div>
          <div className="sentiment-sentence__token-data">
            {sentimentObject.tokens.map((token, tokenIndex) => {
              let entityIndex = -1;
              for (
                let index = 0;
                index < sentimentObject.entities.length;
                index++
              ) {
                let entity = sentimentObject.entities[index];
                if (
                  entity.raw === token.raw &&
                  entity.fromIndex === tokenIndex
                ) {
                  entityIndex = index;
                  break;
                }
              }

              return (
                <div
                  className={`token ${entityIndex !== -1 ? "entity-item" : ""}`}
                >
                  <span
                    id="raw"
                    className={`${
                      token.profile.emphasis > 1 ? "emphasis" : ""
                    } ${
                      token.profile.sentiment > 0
                        ? "positive"
                        : token.profile.sentiment < 0
                        ? "negative"
                        : ""
                    } `}
                  >
                    {token.raw}
                    {entityIndex !== -1 ? (
                      <span className="entity">
                        {sentimentObject.entities[entityIndex].type}
                      </span>
                    ) : (
                      ""
                    )}
                  </span>
                  <span id="pos">
                    {token.pos}{" "}
                    {token.profile.sentiment
                      ? `/ ${token.profile.sentiment.toFixed(2)}`
                      : ""}
                  </span>
                </div>
              );
            })}
          </div>
        </div>
      ))}
      <div className="sentiment-sentence__time-taken">
        Total time: {scriptTime} milliseconds
      </div>
    </div>
  );
};

export default SentimentStats;
File: src/components/SentimentStats
App Preview:
Step 4: Adding the Loader and random text generator button
This is an optional but fun step where we will be adding two UI enhancements to our app:
- Loader: to indicate that the api response is still pending
- Random Text Generator: to help with initial query text
import React, { useRef, ... } from "react";
...

const App = () => {
  ...
  const currentSelectedRandomText = useRef("");

    // random text generator funciton
  const generateRandomText = () => {
    const randomTextArray = [
      "Home is the best place to rest",
      "money is awesome but not everything",
      "Slow and steady wins the race",
      "I'm feeling the winter blues",
      "omg so bored & my tattoooos are so itchy!!  help! aha =)",
      "just got back from church, and I totally hate insects.",
      "Sports bikes are fun and interesting",
      "Taking Katie to see Night at the Museum",
      "I love watching the sunset from the mountains",
      "Men do cry, but with attitude"
    ];
    let textIndex = Math.floor(Math.random() * 10);
    while (currentSelectedRandomText.current === randomTextArray[textIndex]) {
      textIndex = Math.floor(Math.random() * 10);
    }

    setSearchText(randomTextArray[textIndex]);
    currentSelectedRandomText.current = randomTextArray[textIndex];
  };

  return (
    <div className="app-root">
      {/* loader overlay */}
      {isSearching && <div className="loader-overlay">Loading...</div>}
      <div className="input-wrapper">
        ...
             {/* button to generate random text */}
             <button id="random-text-btn" onClick={generateRandomText}>
          Generate Random Text
       </button>
      </div>
      ...
    </div>
  );
};

ReactDOM.render(...);
App Preview:
Summary
In this post, we show how to build an emoji searcher app using React, Elasticsearch (or OpenSearch), and ReactiveSearch scripts (hosted with appbase.io).
The ideas used here are generally applicable and you can build some fun and useful search applications that make use of Natural Language Understanding or sentiment analysis.
Step 1: Adding the search input element CSB link
Step 2: Adding the result component CSB link
Step 3: Adding the sentiment analysis section CSB link
Step 4: Add the loader and random text generator button CSB link
The full codebase for the application we just built is available over here: https://github.com/appbaseio-apps/emoji-search.