How to Build BookSearch App using Vue.js and ElasticSearch
High-performing Frontend Engineer with 5+ years of experience driving innovation in startups and open-source communities. Proven expertise in:
- Co-authoring/contributing to libraries like reactivesearch, searchbox, and appbase-js
- Building search experiences with robust features like analytics, machine learning, and pipelines
- Developing a no-code/low-code UI builder for rapid search experience creation
Key Achievements:
- Slashed search interface development time by 90% (from months to hours)
- Enabled rapid multi-page creation in under 5 minutes with customizable templates and built-in authentication
- Supported React and Vue, increasing time-to-market by 100-200% and reducing maintenance costs
Active community member, sharing knowledge through blogs on Hashnode. Versatile professional with experience in:
- Dev relations and interview conducting
- Mentoring and collaborating with teams (mentored over 3 batches of candidates)
- Remote work with a self-driven attitude (working remotely since the start of my career)
Passionate about airplanes, yoga, and swimming. Let's connect and build something amazing!
In this post, we are going to build a Booksearch Application using Vue.js and ElasticSearch. You might have already heard of Vue.js, one of the fastest-growing JavaScript frameworks. You might also have heard about ElasticSearch — it is the #1 search engine. In any case, I will do a walkthrough explaining the basics of Search and build the app in a step-by-step manner. ReactiveSearch Vue 1.0 — UI Components for Search
Before diving in, you can try out the Live demo of the final app here.
.
.
.
.
What is ElasticSearch
ElasticSearch is a blazingly fast, open-source, full-text search engine. It allows you to store, search, and analyze both small and large volumes of data quickly (we are talking milliseconds here). It is generally used as the underlying engine/technology to power applications that have complex search features and requirements. You can read more about it here.
Why ElasticSearch
With ElasticSearch, you can build a fast search that utilizes its powerful Query DSL. However, setting up ElasticSearch correctly requires a lot of work. For instance, the mappings, analyzers, and tokenizers need to be set correctly or you may not receive accurate search results back. Besides, the more filters that get applied along with the search query, the more complex the resulting search query becomes.
Setting Up ElasticSearch
Setting up and maintaining our own search engine cluster can be time-consuming and costly. So we will be using **Appbase.io **to save our time and cost of maintaining Cluster.
At appbase.io, we have built some open-source tools to help you do all these things within a matter of clicks.
Tool to add data into ElasticSearch — Importer
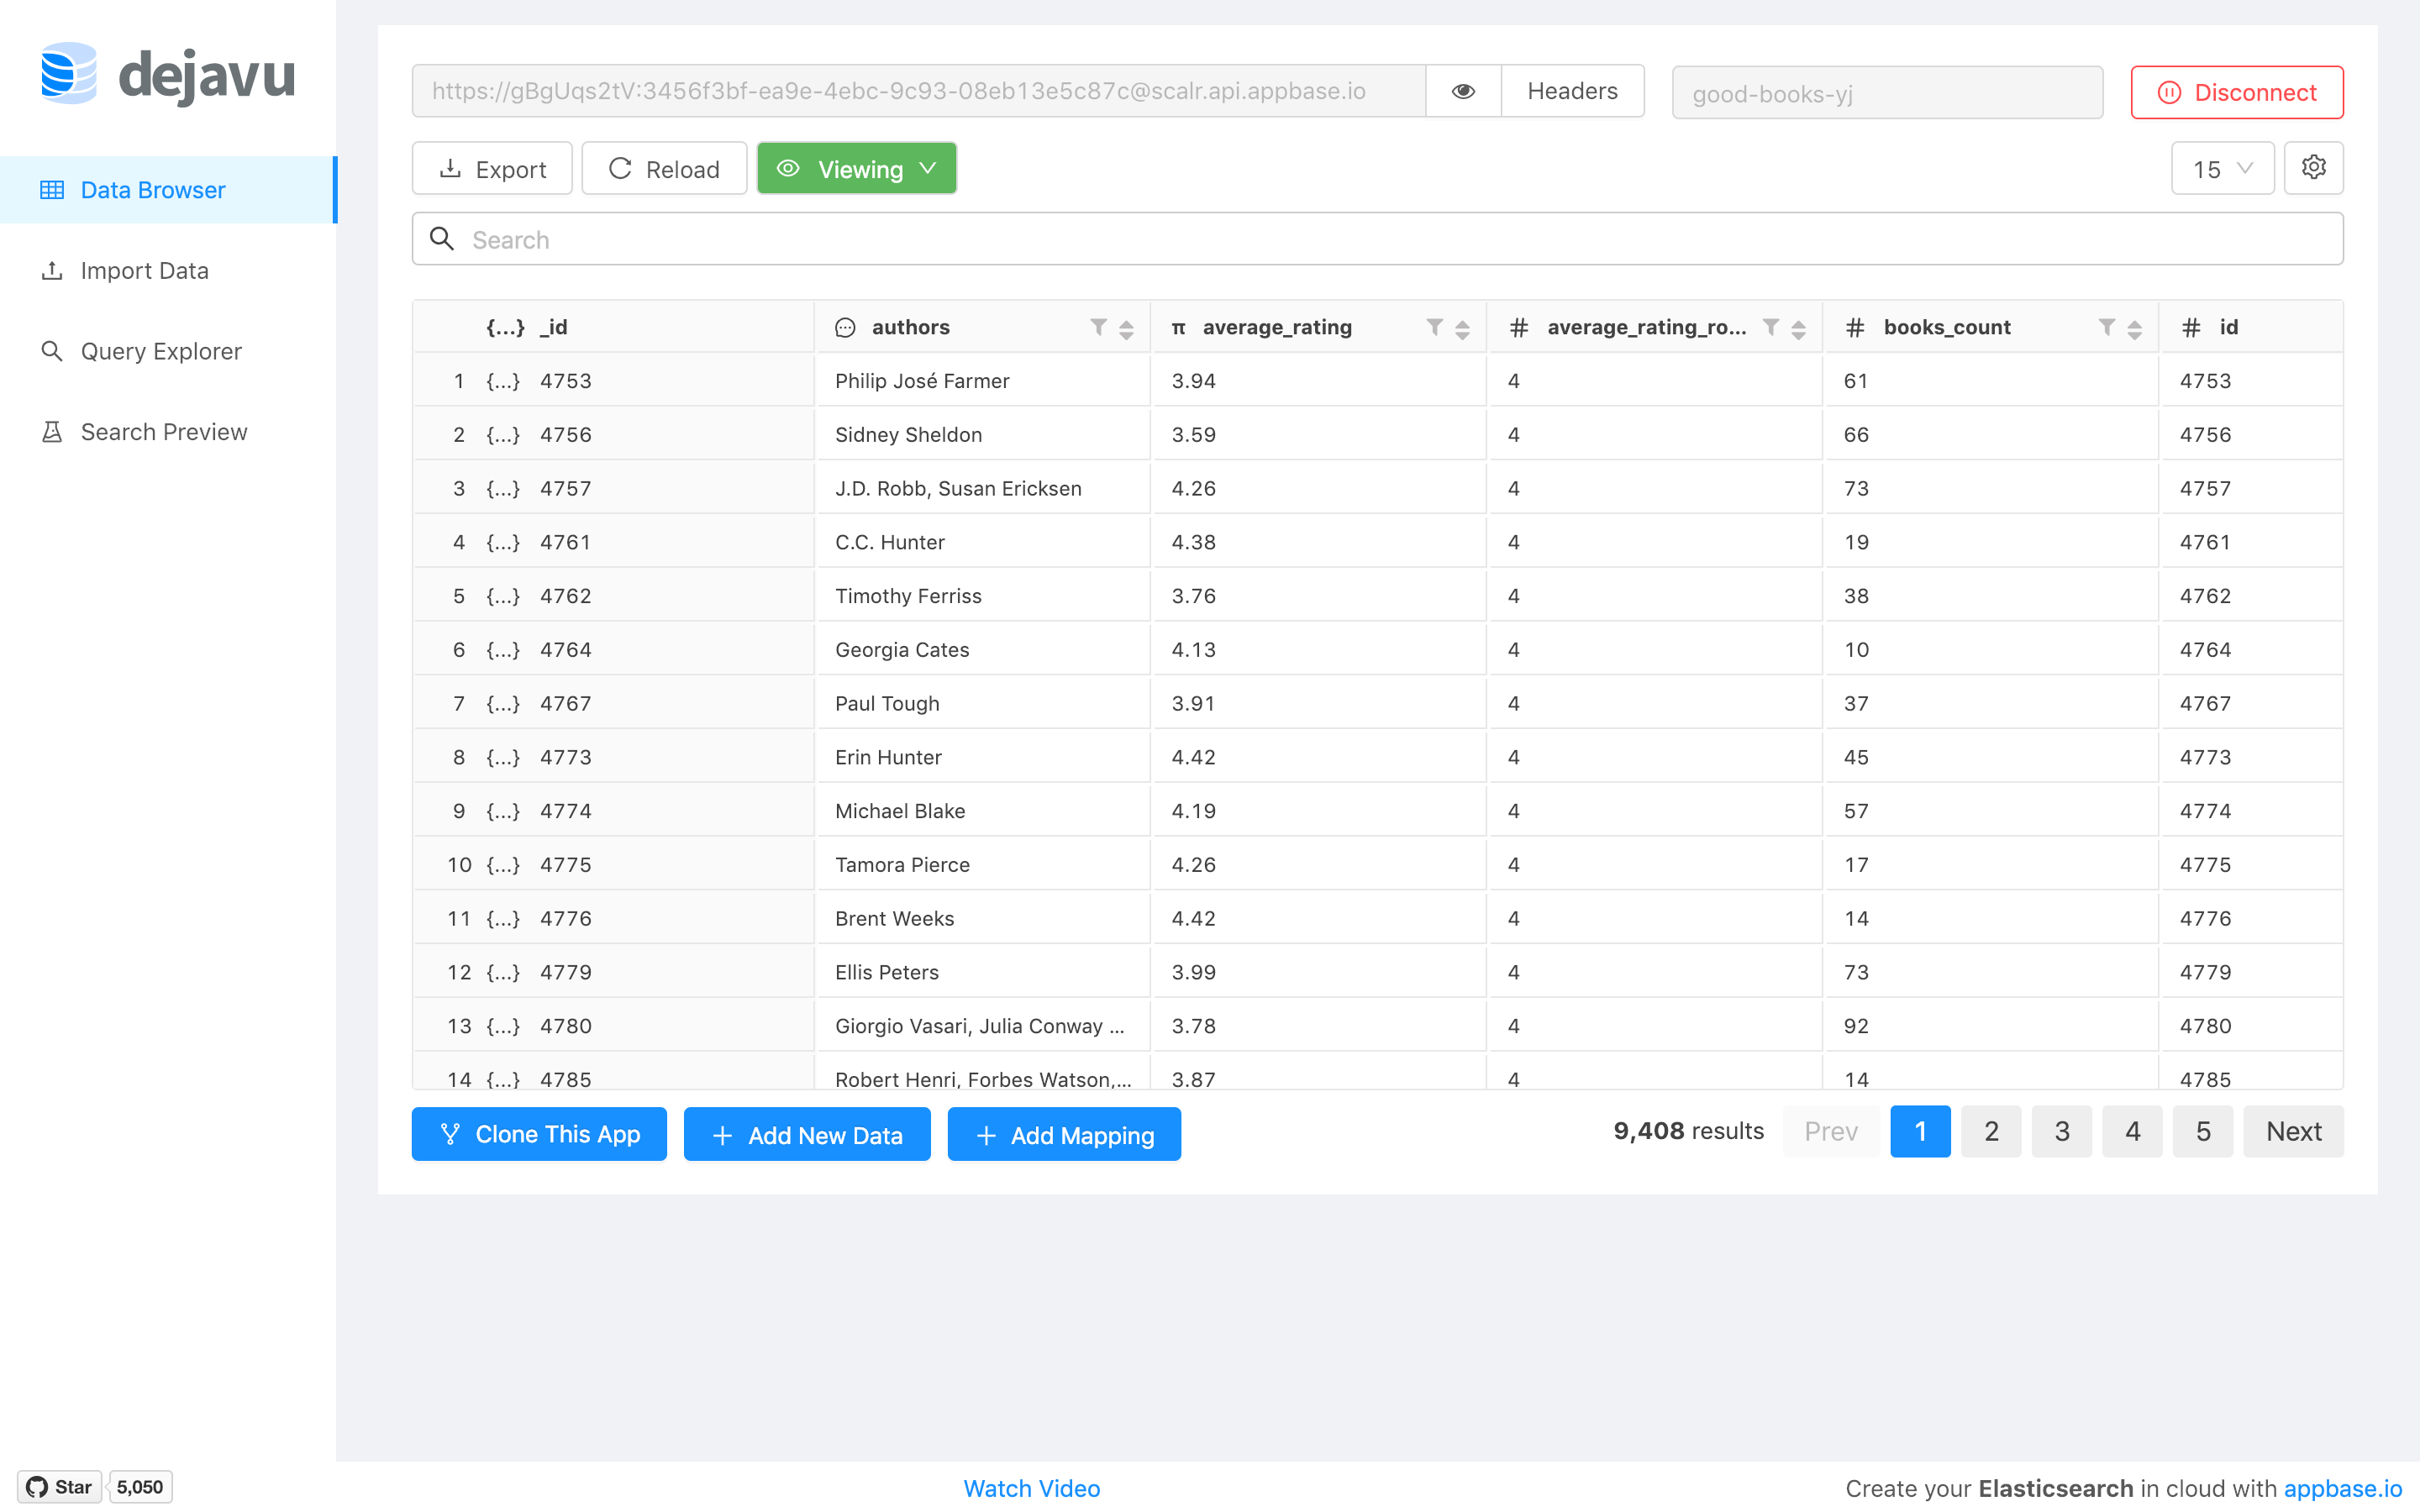
Tool to view ElasticSearch data like an excel sheet — Data Browser
Tool to generate relevant ElasticSearch queries easily — Query Builder
In this blog post, we will be using these tools to utilize the strength of ElasticSearch with Vue to build powerful apps.
Building our Search Backend
As mentioned above, we will be using appbase.io for our search backend. It offers a real-time search API service based on ElasticSearch. This saves us time and the cost of setting up and maintaining our own search engine cluster.
This means that we wouldn’t require writing any server code. 💥
In order to make the Booksearch application, we will need a dataset of some really good books. I have already created an appbase.io app with the books dataset indexed over here. You can either clone this dataset to use your own credentials or copy the below credentials:
app="good-books-ds"
url="https://6a0ae3a3a8d4:6a3f508d-169b-4ed7-9680-20658120930f@appbase-demo-ansible-abxiydt-arc.searchbase.io"
How to use ElasticSearch with Vue.js?
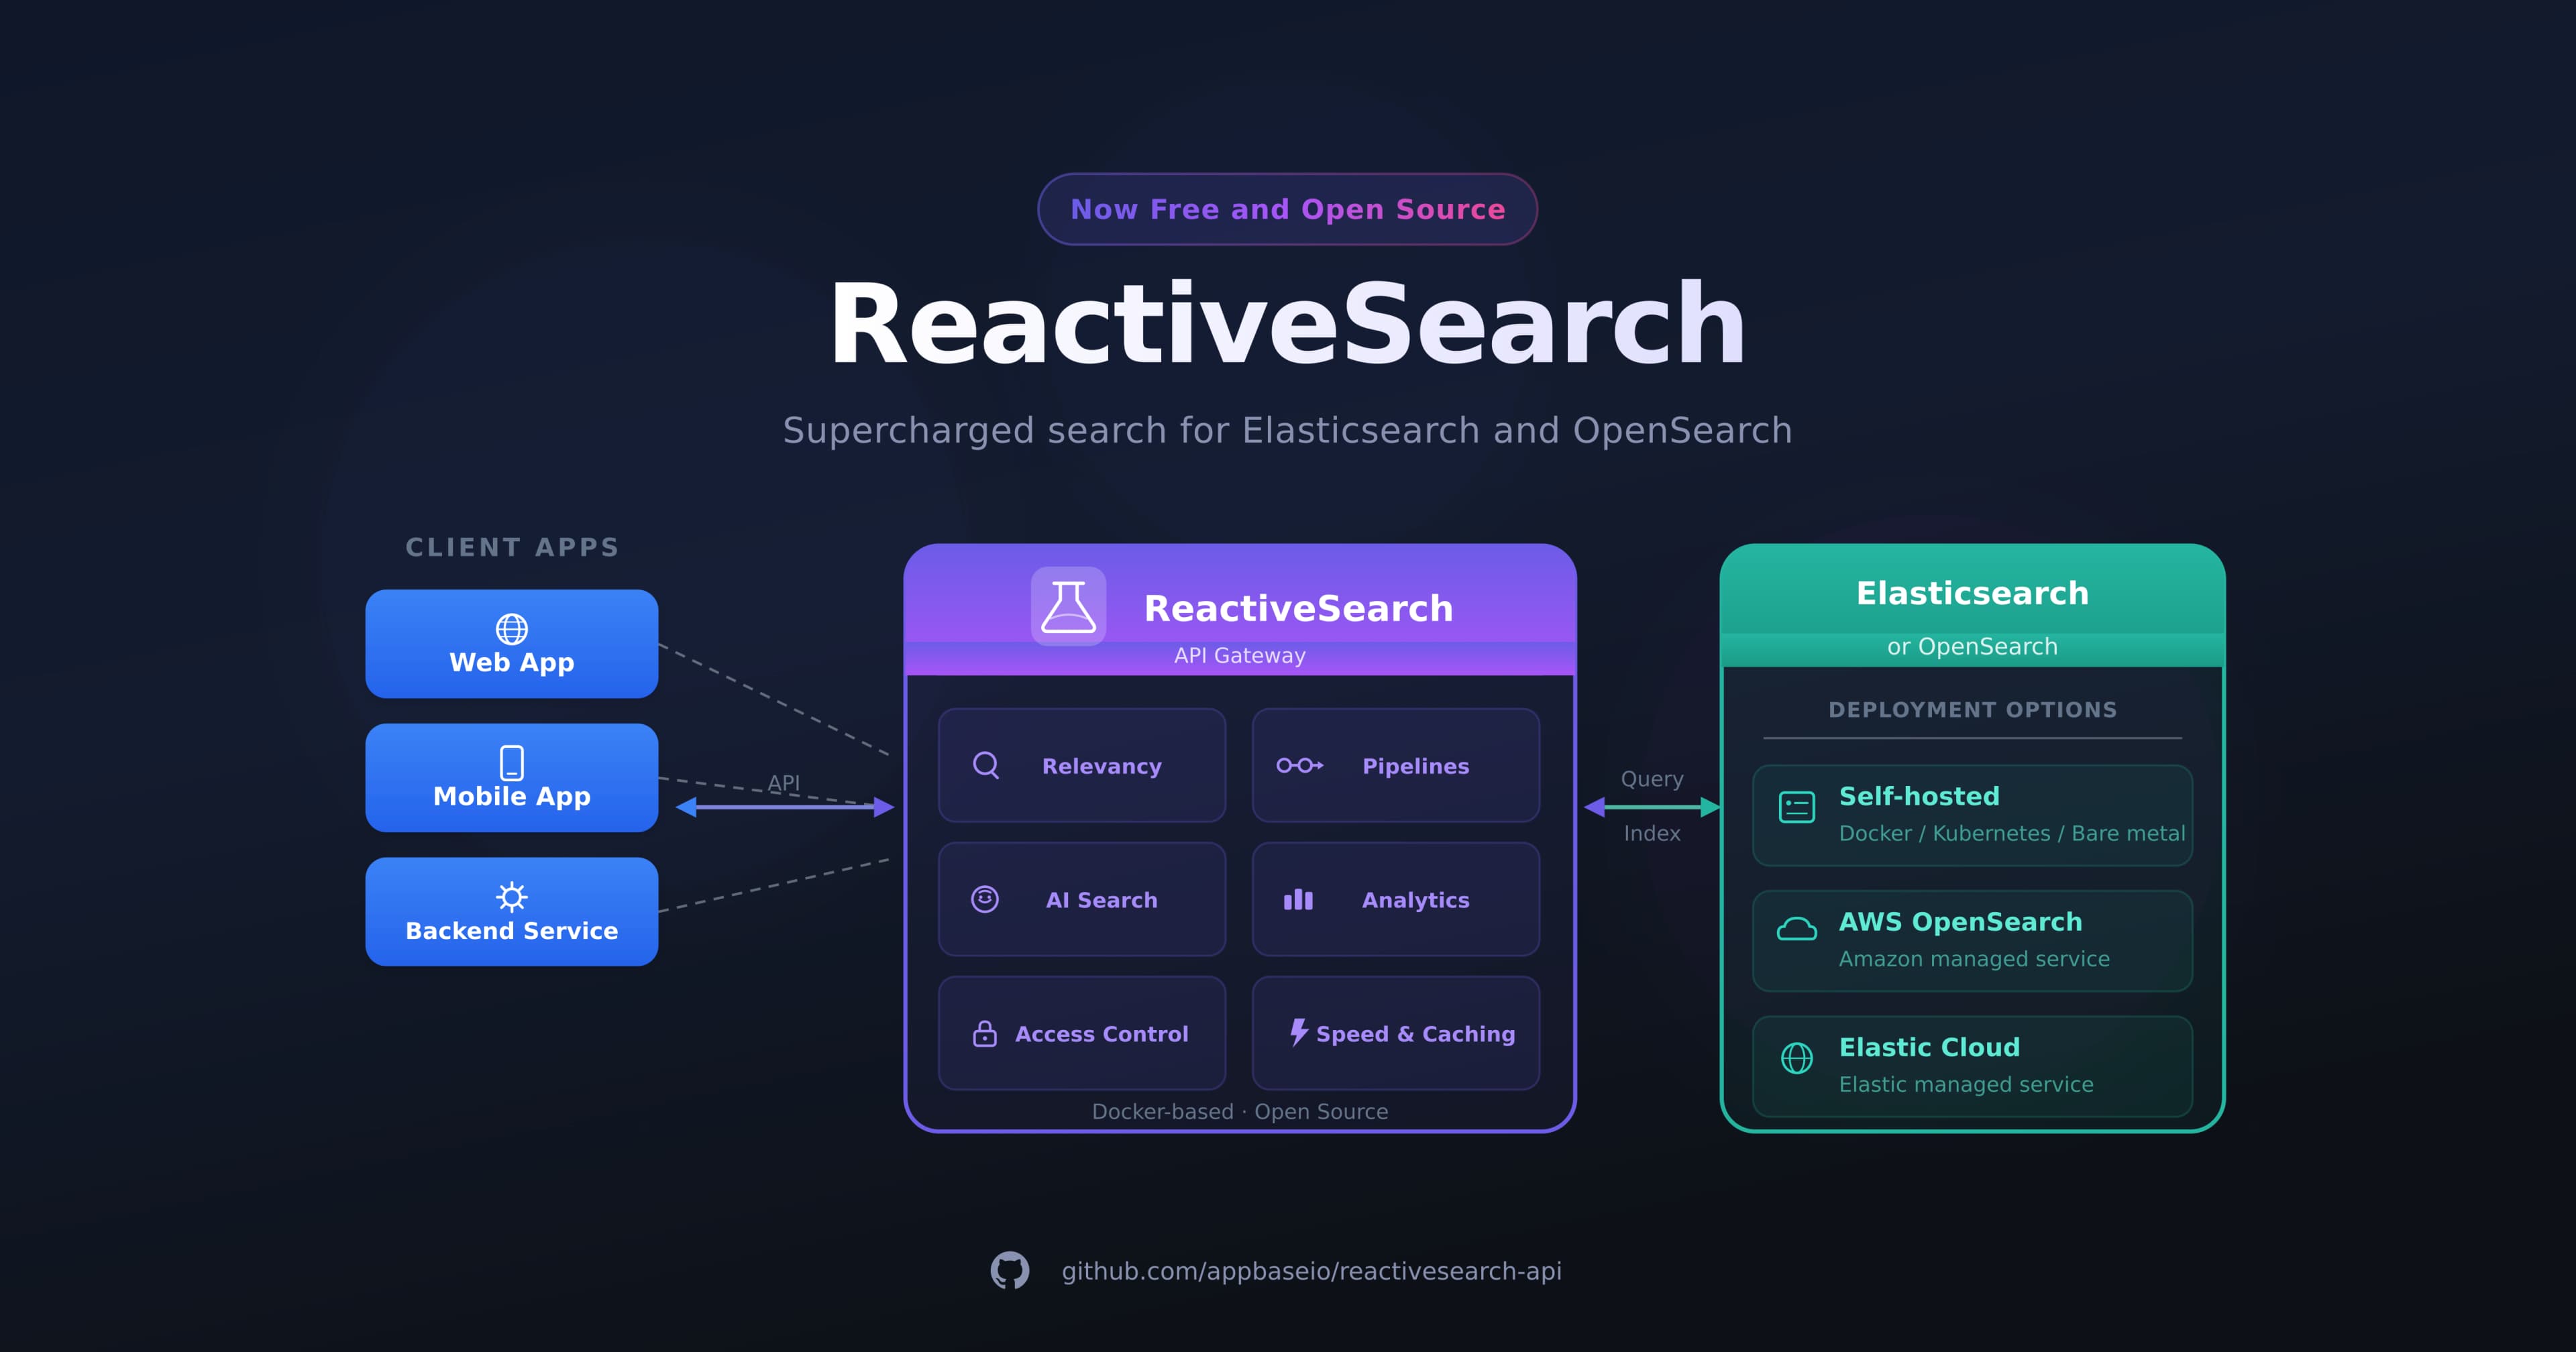
We will be using the **ReactiveSearch-vue** open-source library to build the Booksearch application in this post. This library offers a range of highly customizable rich UI components that can connect with an ElasticSearch index hosted anywhere. It provides scaffolding to build UIs such as Airbnb, Yelp, you name it. We will show how simple it is to build one by creating our Booksearch app.
ReactiveSearch for Vue is a port of ReactiveSearch (written for React) that has been downloaded over 125,000 times in the past year and currently powering hundreds of production search UIs. You can read more about the Vue.js announcement here: Vue.JS Components for building Search UIs
Setting Up Frontend
Step 1: Base setup of Vue.js with ReactiveSearch
We will use Codesandbox.io to help us build our application in a step-by-step fashion. Open the above link and click on the Open Vue button.
CodeSandbox for Vue
If you instead want to develop this locally, you can also use vue-cli. You can read more about it here.
Install ReactiveSearch for Vue
Now we can add our dependency by clicking the Add Dependency button on CodeSandbox and searching for reactivesearch-vue, or if you are working locally you can install the package:
yarn add @appbaseio/reactivesearch-vue
Step 2: Adding components from the ReactiveSearch library
Now that we have the dataset to play around with and we are also done with our setup, it’s time for adding components to our app.
We need to first register the library so that we can use the components in the main.js. We can do this via the use method of Vue:
import ReactiveSearch from "@appbaseio/reactivesearch-vue";

Vue.use(ReactiveSearch);
Connecting our Search Backend via ReactiveBase Component
All the ReactiveSearch components are wrapped inside a container component — ReactiveBase which connects the components to an Elasticsearch index. We’ll apply this in the /src/App.vue file. You can read more about Reactivebase here.
<ReactiveBase
  app="good-books-ds"
  url="https://6a0ae3a3a8d4:6a3f508d-169b-4ed7-9680-20658120930f@appbase-demo-ansible-abxiydt-arc.searchbase.io"
  :enableAppbase="true"
>
      <h1>Hello from ReactiveBase 👋</h1>
</ReactiveBase>
The app and credentials: urlare taken from my appbase.io app. In case you are using your own app, you can swap the values in L2 and L3.
Using SearchBox Component for the main search
SearchBox creates a search box UI component that is connected to one or more database fields. A SearchBox queries the appbase.io backend with query type suggestion to render different kinds of suggestions.
<SearchBox
  componentId="search-box"
  iconPosition="left"
  :dataField="[
            'original_title',
            'original_title.search',
            'authors.search',
            'authors.raw',
            'authors.autosuggest',
            'authors',
          ]"
  className="search-box"
  :showClear="true"
  placeholder="Search for books"
  :enableRecentSuggestions="true"
  :enablePopularSuggestions="true"
  :enablePredictiveSuggestions="true"
  :popularSuggestionsConfig="{
            size: 3,
            minHits: 2,
            minChars: 4,
            index: 'good-books-ds',
          }"
  :recentSuggestionsConfig="{
            size: 3,
            minChars: 4,
            index: 'good-books-ds',
          }"
  index="good-books-ds"
  :size="10"
>
    <div class="addon" slot="addonAfter">
        <div class="focus-icon">/</div>
    </div>
</SearchBox>
dataField prop values are the name of the field on which we want to apply our search.
iconPosition is used to align the search icon to the right or left.
You can learn more about these component props over here.
Use MultiList Component for Authors filter
We always want to read the book from our favorite authors so why not built an option to select our favorite authors and search through the list of authors.
<MultiList
  componentId="Authors"
  dataField="authors.keyword"
  class="filter"
  title="Select Authors"
  selectAllLabel="All Authors"
  :react="{ and: ['Ratings', 'search-box'] }"
/>
In this component, dataField the attribute defines the data field to be connected to the component’s UI view. the title attribute gives the heading to the component, while class an attribute is used to provide the class name to the MultiList container. We can use react a prop that allows components to watch each other and update their data reactively. For example, an Authors Filter component can update its data based on the selected fields in the Rating Filter component and DataSearch component.
You can learn more about the attributes of this component here.
Screen After adding MultiList ✨
Use RatingsFilter Component for Rating filter
We want only the best books for us, so why not create an option to filter the best-rated books on our dataset.
SingleRange component displays a curated list of items where only one item can be selected at a time. Each item represents a range of values, specified in the data prop of the component.
<SingleRange
  componentId="Ratings"
  dataField="average_rating"
  :data="[
    { 'start': 0, 'end': 3, 'label': 'Rating < 3' },
    { 'start': 3, 'end': 4, 'label': 'Rating 3 to 4' },
    { 'start': 4, 'end': 5, 'label': 'Rating > 4' }
  ]"
  title="Book Ratings"
  class="filter"
/>
In this component, dataField the attribute defines the data field to be connected to the component’s UI view. title attribute gives the heading to the component, while :data an attribute is a collection of UI labels with associated start and end range values. You can read more about the attributes of components here.
:data is the shorthand for v-bind:data which is used to pass data to the components.
Screen after adding SingleRange 🚀
Step 3: Use ReactiveList Component for displaying Book Results
ReactiveList creates a data-driven result list UI component. This list can reactively update itself based on changes in other components or changes in the database itself.
<ReactiveList
  componentId="SearchResult"
  data-field="original_title.raw"
  :pagination="true"
  :from="0"
  :size="8"
  :showResultStats="true"
  :react="{ and: ['Ratings', 'Authors', 'search-box'] }"
  :innerClass="{ list: 'books-container', poweredBy: 'appbase' }"
>
            <div slot="renderItem" class="book-content" slot-scope="{ item }">
              <a
                key="item._id"
                target="_blank"
                :href="
                  'https://www.google.com/search?q=' +
                  item.original_title.replace(' ', '+')
                "
              >
                <div class="image">
                  <img :src="item.image" alt="Book Cover" class="book-image" />
                  <div class="rating">
                    {{ item.average_rating_rounded }} ⭐️
                  </div>
                  <div class="details">
                    <h4 class="book-header">{{ item.original_title }}</h4>
                    <p>By {{ item.authors }}</p>
                  </div>
                </div>
              </a>
            </div>
</ReactiveList>
In this component, pagination is used to show the pagination at the bottom of the list. react is used to watch changes through different components like SingleRange and MultiList in our case. You can read more about these component properties here.
Notice slot and slot-scope it is used to get data from the child component to the parent component. If you have used React it is like a render-prop. You can read more about it here.
Screen after adding the ReactiveList component ✨
Step 4: Styling the Application
We will now make use of some styles to make the application look elegant and professional. We can add styles to an element using class and add their respective CSS in styles.css.
You can get all the styles here & add them to App.vue.
We will also make this app mobile responsive. To do this, we will use a variable to hide/show filters using a button when we are on a mobile viewport.
<script>
import "./styles.css";
export default {
  name: "app",
  data: function() {
    return {
      showBooks: window.innerWidth <= 768 ? true : false
    };
  },
  methods: {
    switchContainer: function() {
      return (this.showBooks = !this.showBooks);
    }
  }
};
</script>
Adding styles and Methods & structuring to handle small screen 📱
<button class="toggle" @click="switchContainer">
  {{ showBooks ? 'Show Filter 💣' : 'Show Books 📚' }}
</button>
The button to switch views
@click is shorthand for v-on:click. It is used to track whenever a click event is fired on the button.
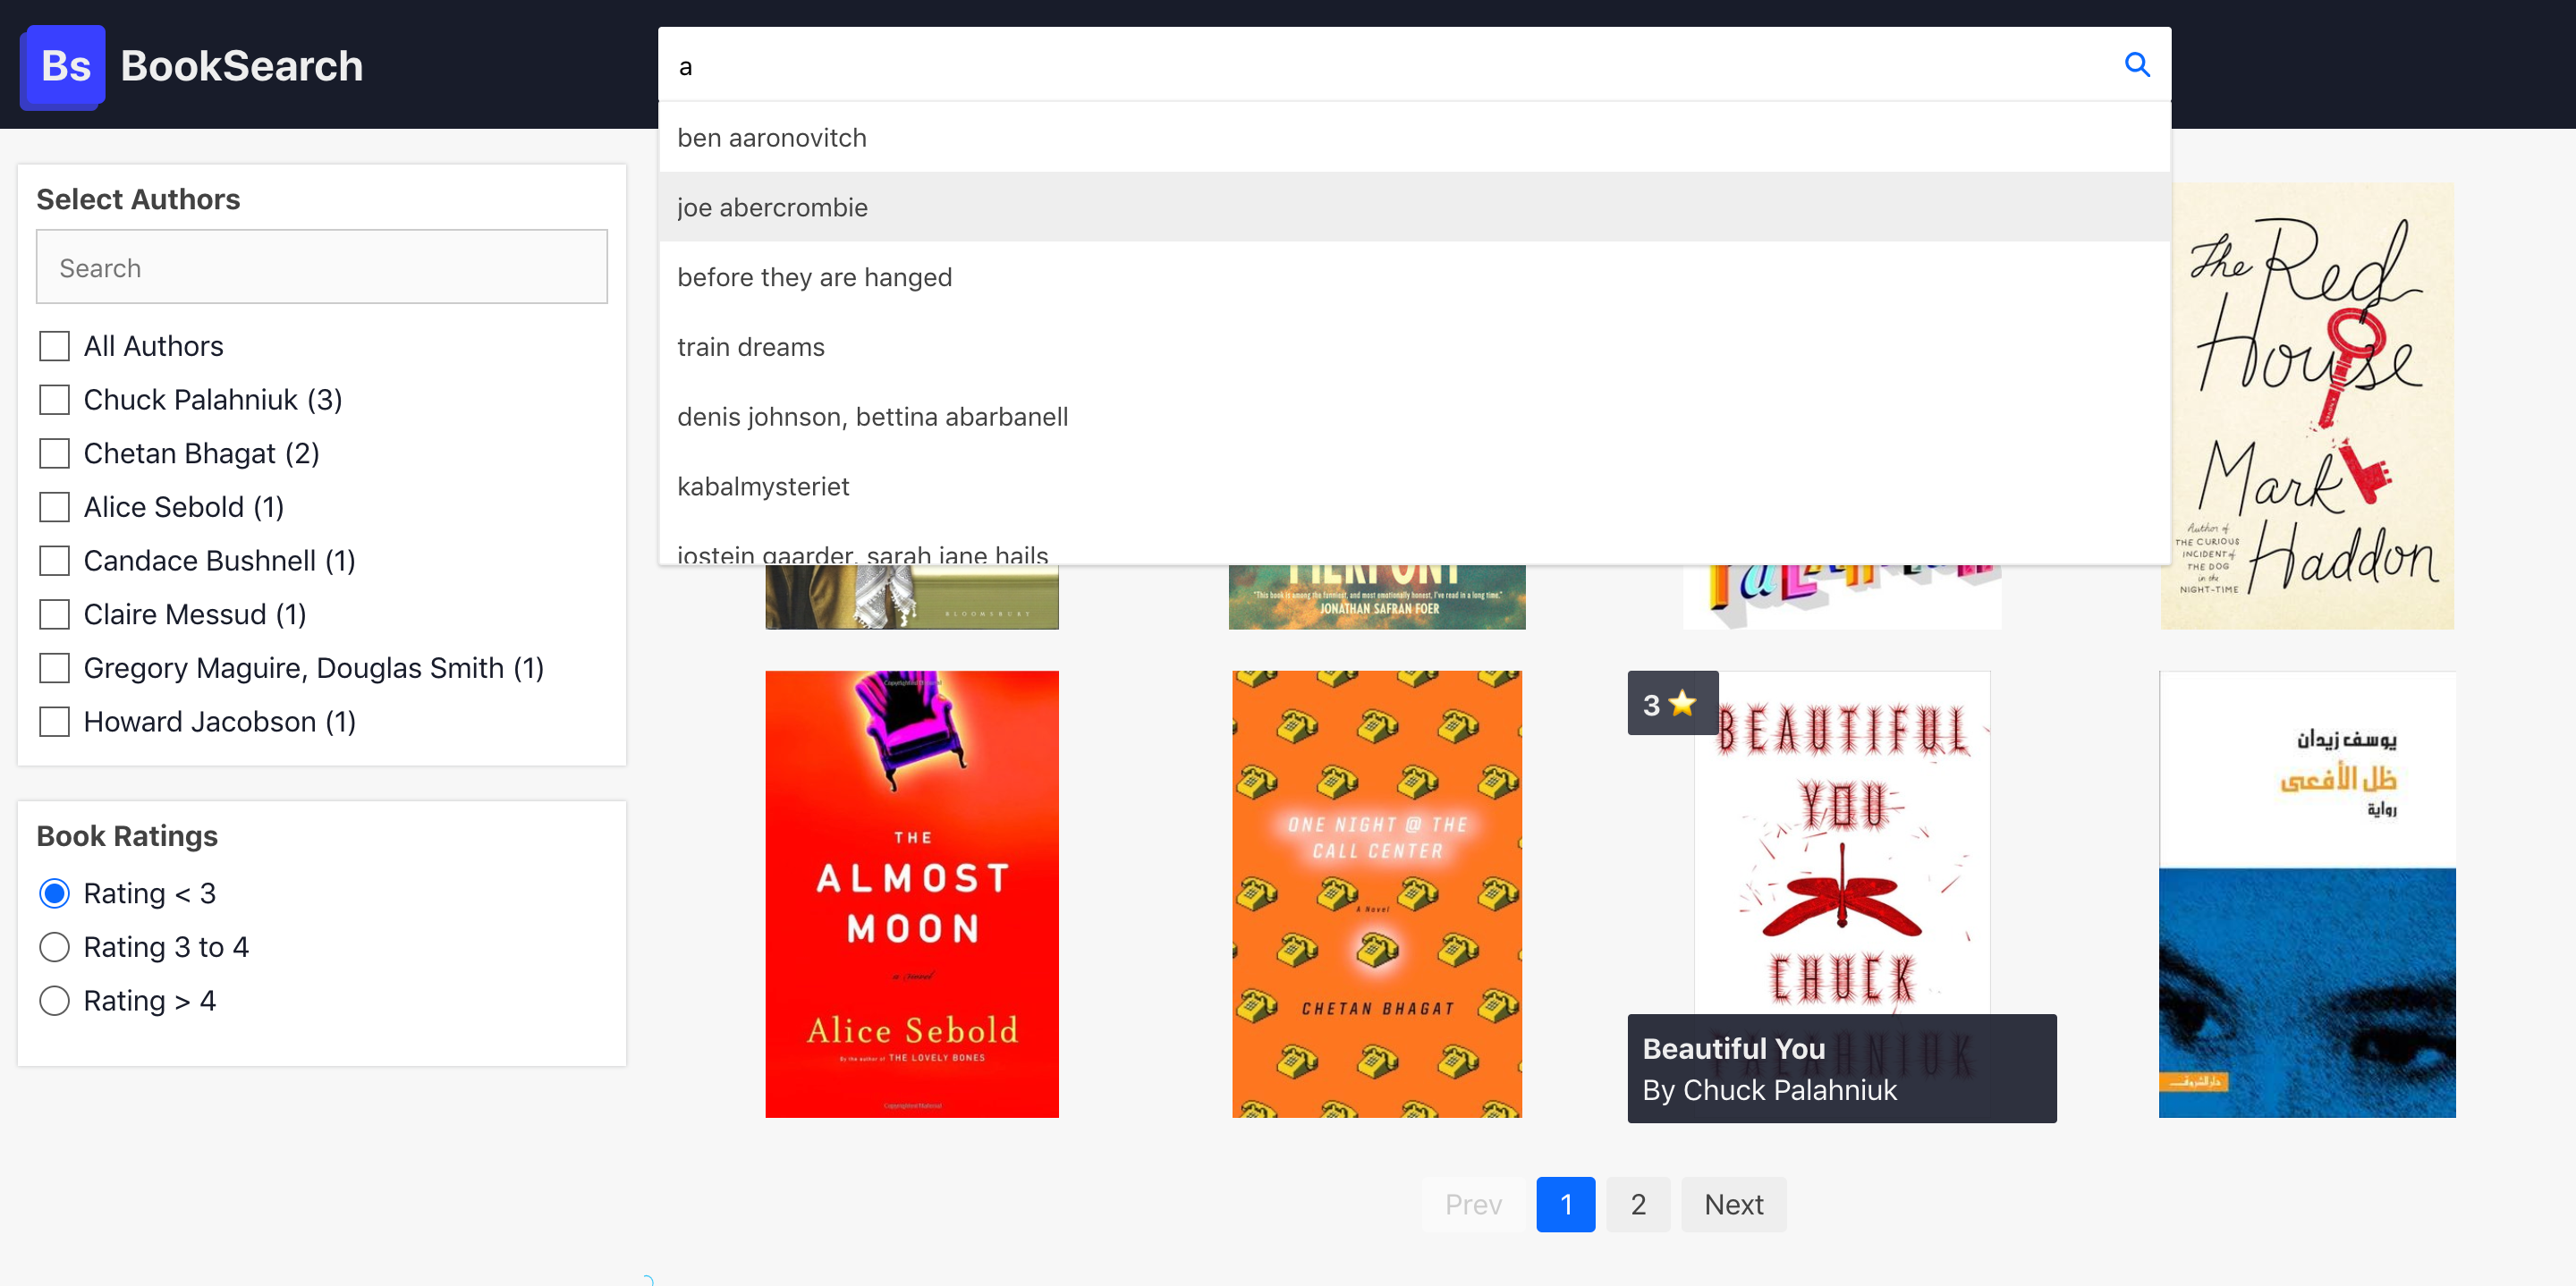
Final Application 📚
Summary
Here comes the end of our journey, and we have got our awesome Booksearch app built with ReactiveSearch-Vue. To summarize everything so far:
This post introduces ReactiveSearch-Vue — A Vue.js UI components library for ElasticSearch that provides scaffolding for building great search experiences. Next, we went step-by-step to add different UI components and style our app.
Step 1: Base setup for Vue with ReactiveSearch — CodeSandbox here.
Step 2: Adding components from ReactiveSearch library — CodeSandbox here.
Step 3: ****Displaying data using ReactiveList — CodeSandbox here.
Step 4: Adding styles to make responsive and professional — CodeSandbox.
Check out the live demo here.
Alternatively, if you want to build this app locally using Vue-CLI, you can check out the Github repo here.
Useful References
All ReactiveSearch components can be interactively tried using the playground at https://reactivesearch-vue-playground.netlify.com/.
The documentation for all the components is available at https://docs.appbase.io/docs/reactivesearch/vue/overview/QuickStart/.
Finally, go ★ ReactiveSearch on Github so you can find it when you need to build that awesome search!