

Tutorial: Build A Movie Search UI With ReactiveSearch
Learn how to build a faceted React search UI with a search-as-you-type auto suggest UI. We will use the open-source ReactiveSearch library to do this!


Table of contents
- You can try out the Live Demo of the final app over here to see what you will be building along!
- Things we will need
- Step 1: Base setup for CRA with ReactiveSearch
- Step 2: Setup with SearchBox and all the filter components from ReactiveSearch
- Step 3: Styling the components we have so far
- Step 4: Adding ReactiveList component and making our app responsive
- Step 5: Adding overlay effect on result cards
- Bonus Step: Using SSR with next.js
- Summary
- Useful References
Search is the window into what your users want. Whether you're building an e-commerce store, a SaaS product, a marketplace, or an aggregator, search experiences remain the biggest driver to insights into your users' wants, and directly impact conversions/sales.
In this post, we will show how to use React with Elasticsearch to build a movie search app - however, the general principles will apply to all of the above use cases. This is also a good tutorial to build along if you're a React developer looking to add an interesting project to your portfolio.
We will start with understanding the basics of Elasticsearch and OpenSearch — What is it? Why should you care about it? And, how can you use it with React to build powerful apps painlessly?
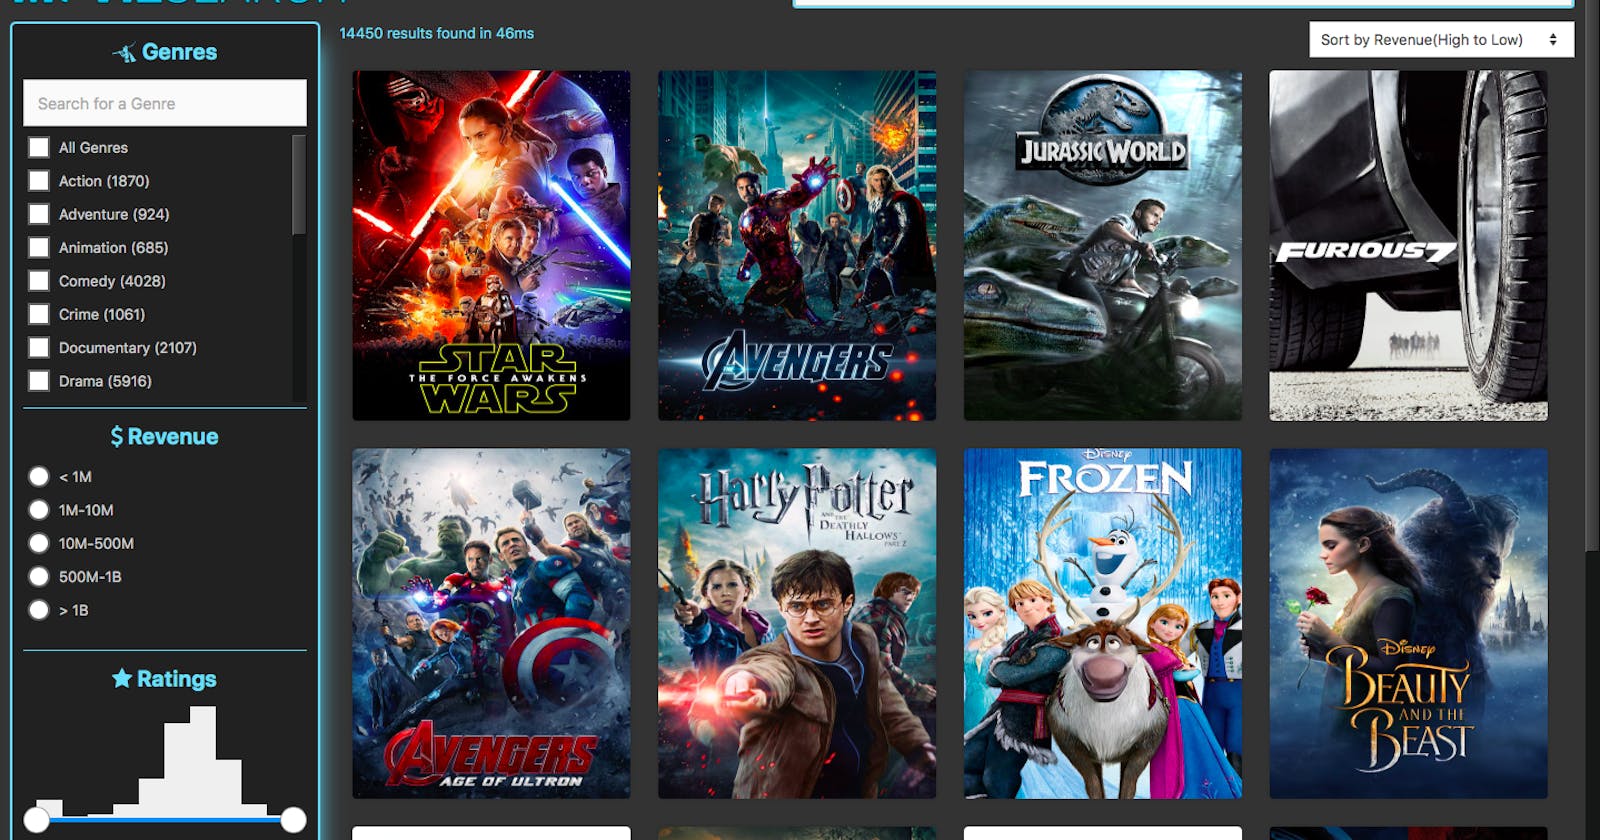
You can try out the Live Demo of the final app over here to see what you will be building along!
What is Elasticsearch and why should you care about it?
Now, let’s understand the role of Elasticsearch for search use-cases. Elasticsearch is a super-fast, open-source, full-text search engine. It allows you to store, search, and analyze big volumes of data quickly (we are talking milliseconds here). It is generally used as the underlying engine/technology that powers applications that have complex search features and requirements. You can read more about it here.
In 2021, OpenSearch started out as an Apache 2.0 fork of Elasticsearch and is maintained by AWS. While this blog post is written for Elasticsearch, it would also apply if you're using OpenSearch as your search backend.
With Elasticsearch, you can build a fast search utilizing its powerful Query DSL. However, setting up Elasticsearch correctly requires a lot of work. For instance, the data mapping, analyzers, and tokenizers need to be set correctly or you may not receive accurate search results back. Besides, the more filters that get applied along with the search query, the more complex the resulting search query becomes.
Building an app search or enterprise search experience requires more than a hosted Elasticsearch service. Appbase.io provides a no-code experience to importing data into your search index, configuring search relevance, as well as building consumer grade search UIs. An app built with appbase.io would then get search insights. It works with any hosted Elasticsearch provider or can come batteries included with Elasticsearch, the way we will use it here to get up and running quickly.
At appbase.io, we have also built some open-source tools to help you do all these things within a matter of clicks.
Tool to add data into ElasticSearch — Importer
Tool to view ElasticSearch data like an excel sheet — Data Browser
UI components library for React and Vue - ReactiveSearch
Searchbox UI component library for React, Vue, Vanilla JS (as well as for Angular, Svelte), React Native and Flutter - Searchbox
How to use Elasticsearch with React?
We will be using ReactiveSearch open-source library to build the movie search app in this post. It offers over 20 UI components, search state management, theming as well as customizability to bring your own UI component or design system.
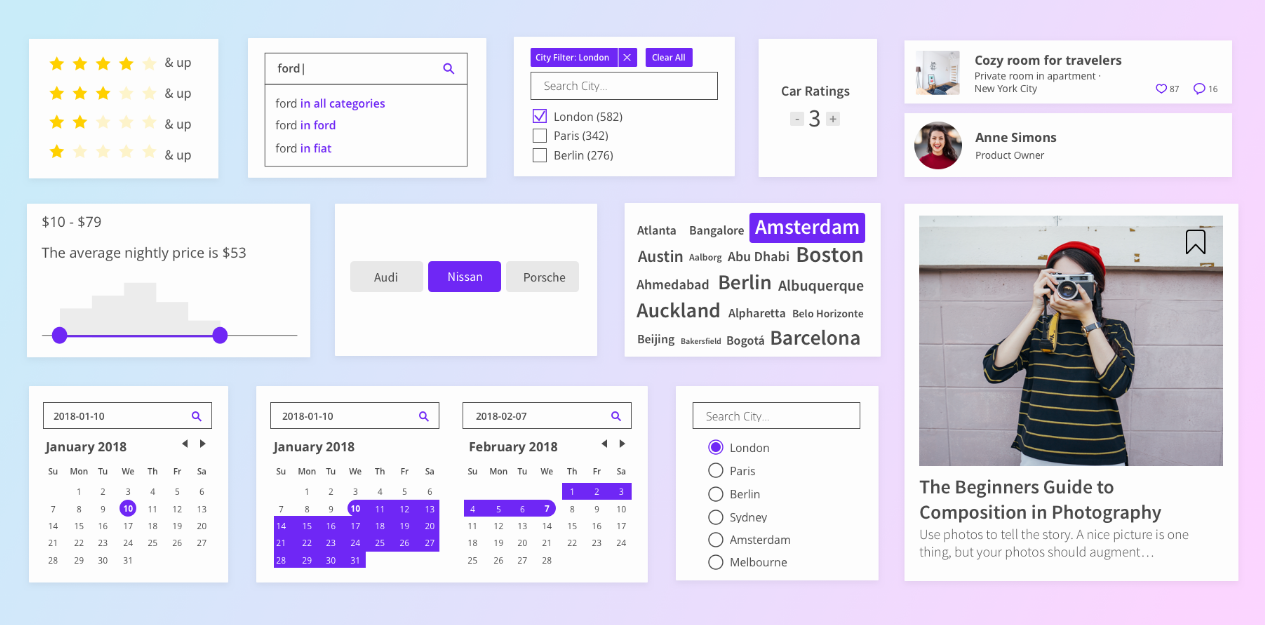
Image: A preview of the UI components offered by ReactiveSearch.
Things we will need
In order to build the MovieSearch app, we will need a set of things before we can get started with writing the actual code —
Dataset for MovieSearch App To make a great UI we should have a good dataset. We found an awesome dataset for our MovieSearch App. Here is the link to the dataset: https://www.kaggle.com/rounakbanik/the-movies-dataset.
Elasticsearch Hosting
As mentioned above, we will be using appbase.io for our search backend.
I’ve already created an appbase app with the MovieSearch dataset indexed in it. You can browse it with dejavu over here:
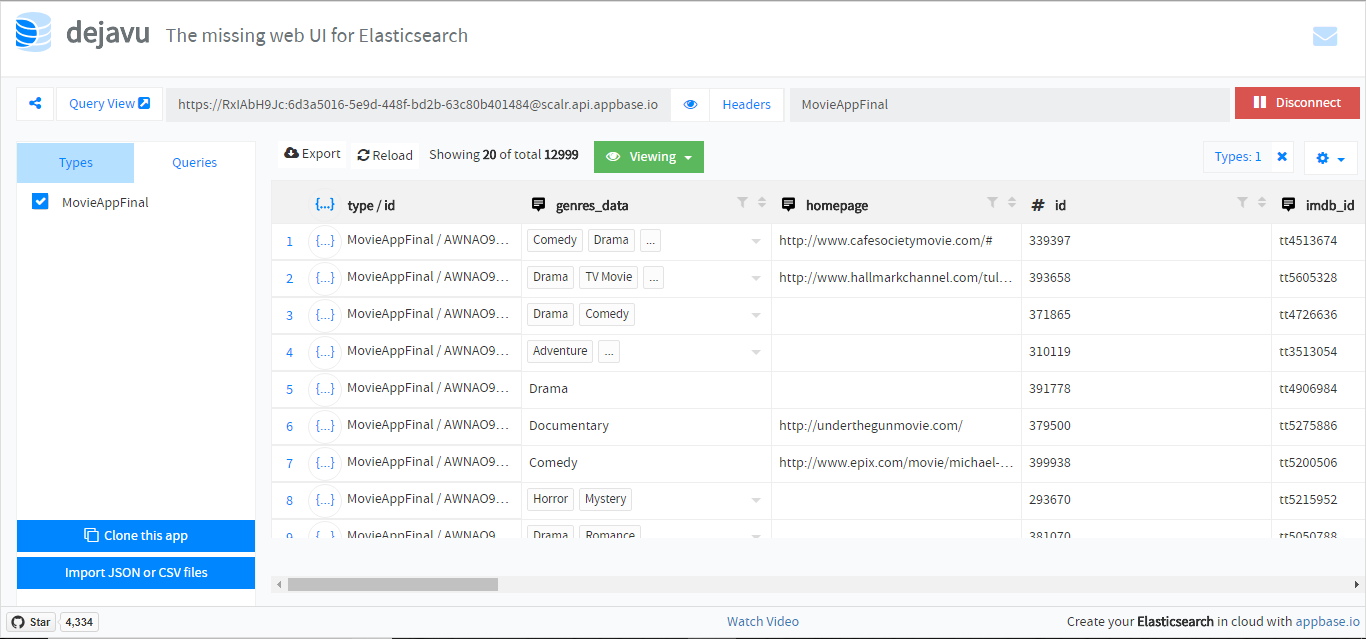
The URL of the above app is:
app="movies-demo-app"
url="https://81719ecd9552:e06db001-a6d8-4cc2-bc43-9c15b1c0c987@appbase-demo-ansible-abxiydt-arc.searchbase.io"
Now, we will go step-by-step and build our application. We’ll use Codesandbox.io to generate code at each intermediate step, making it easy to test. Click on the above link and click on Open React the button.
Step 1: Base setup for CRA with ReactiveSearch
If you have tried out the Create React App before, you will feel right at home as we build this app.
Create React App
Initialize the CRA setup. We will use npm as the package manager, you can also use yarn , instead.
npx create-react-app moviesearch
cd moviesearch
npm start
Note: npx comes with npm 5.2+ and higher, see instructions for an older release here.
One of the great benefits of using CRA is that it works without requiring to set up a build configuration.
At this point, you should have a directory structure similar to this:
moviesearch
    ├── README.md
    ├── node_modules
    ├── package.json
    ├── .gitignore
    ├── package-lock.json
    ├── public
    │   └── favicon.ico
    │   └── index.html
    │   └── manifest.json
    └── src
        └── App.css
        └── App.js
        └── App.test.js
        └── index.css
        └── index.js
        └── logo.svg
        └── registerServiceWorker.js
Install ReactiveSearch
Next, we will install ReactiveSearch.
npm install @appbaseio/reactivesearch
In addition to the code sandbox above, you can also try the code so far directly from our GitHub — https://github.com/appbaseio-apps/MovieSearch-app/tree/step1.
Step 2: Setup with SearchBox and all the filter components from ReactiveSearch
Adding the first ReactiveSearch component: ReactiveBase
All the ReactiveSearch components are wrapped inside a container component — ReactiveBase which glues the Elasticsearch index and the ReactiveSearch components together. We’ll use this in /src/App.js .
<ReactiveBase
  app='movies-demo-app'
  url='https://81719ecd9552:e06db001-a6d8-4cc2-bc43-9c15b1c0c987@appbase-demo-ansible-abxiydt-arc.searchbase.io'
  enableAppbase
  theme={{
    typography: {
      fontFamily:
        '-apple-system, BlinkMacSystemFont, "Segoe UI", "Roboto", "Noto Sans", "Ubuntu", "Droid Sans", "Helvetica Neue", sans-serif',
      fontSize: "16px",
    },
    colors: {
      backgroundColor: "#212121",
      primaryTextColor: "#fff",
      primaryColor: "#2196F3",
      titleColor: "#fff",
      alertColor: "#d9534f",
      borderColor: "#666",
    },
  }}
>
</ReactiveBase>
The app and URL are taken from my appbase.io app. You can create your own app and add those from your dashboard.
We can set our app’s theme by providing theme attribute prop to our ReactiveBase component. Here, we will use this to give our app a night mode look: theme={{ typography: { fontFamily: '-apple-system, BlinkMacSystemFont, "Segoe UI", "Roboto", "Noto Sans", "Ubuntu", "Droid Sans", "Helvetica Neue", sans-serif',fontSize: "16px" }, colors: { textColor: "#fff", backgroundColor: "#212121", primaryTextColor: "#fff", primaryColor: "#2196F3", titleColor: "#fff", alertColor: "#d9534f", borderColor: "#666" } }} Now let’s start the server with npm start.
Breaking Down The MovieSearch App
To add any component, we have to first import it from the ReactiveSearch library using this statement:
import { component-name } from '@appbaseio/reactivesearch';
Component #1: SearchBox
SearchBox component creates a search bar UI that allows us to search for movies.

.
<SearchBox
  componentId='mainSearch'
  dataField={["original_title", "original_title.search"]}
  categoryField='genres.keyword'
  className='search-bar'
  queryFormat='and'
  placeholder='Search for movies...'
  iconPosition='left'
  autosuggest={true}
  filterLabel='search'
  enableRecentSuggestions={true}
  enablePopularSuggestions={true}
  enablePredictiveSuggestions={true}
  popularSuggestionsConfig={{
    size: 3,
    minHits: 2,
    minChars: 4,
  }}
  recentSuggestionsConfig={{
    size: 3,
    minChars: 4,
  }}
  index='movies-demo-app'
  size={10}
  innerClass={{ list: "list-class" }}
/>
In this component, we are passing the dataField prop with original_title.search value. Here,original_title is the name of the field in the app on which we want to apply our search.
queryFormat sets the query’s format. It can have values either of ['or', 'and']. or returns all the results matching any of the search query text’s parameters. For example, searching for “bat man” with or will return all the results matching either "bat" or "man". On the other hand with and, only results matching both "bat" and "man" will be returned. It returns the results matching all of the search query text’s parameters.
You can learn more about this component over here.
Component #2: MultiList
We will create a genre-based filterable UI component using MultiList.
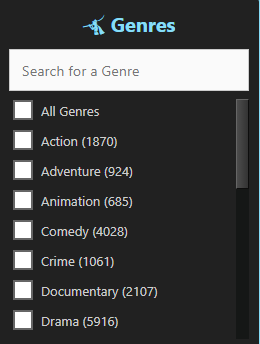
<MultiList
  componentId='genres-list'
  dataField='genres.keyword'
  className='genres-filter'
  size={20}
  sortBy='asc'
  queryFormat='or'
  selectAllLabel='All Genres'
  showCheckbox={true}
  showCount={true}
  showSearch={true}
  placeholder='Search for a Genre'
  react={{
    and: [
      "mainSearch",
      "results",
      "date-filter",
      "RangeSlider",
      "language-list",
      "vote-average-list",
    ],
  }}
  showFilter={true}
  filterLabel='Genre'
  URLParams={false}
  innerClass={{
    label: "list-item",
    input: "list-input",
  }}
/>
In this component, we are passing genres_data as the dataField, the .keyword suffix signifies that we are using the Keyword type (over the Text type) which is suitable for performing an aggregation. Another interesting prop here is react. It specifies the components to watch for when updating the current MultiList’s data view. For example: If we search for “Bat man”, the MultiList’s view will also be simultaneously updated to only show results that match the search query. The showCount prop controls whether to show the count values next to each item. The innerClass prop allows us to set CSS styles to particular elements within the component. You can learn more about this component here.
Component #3: RangeSlider
RangeSlider will help us to make a UI widget for a ratings-based filter.
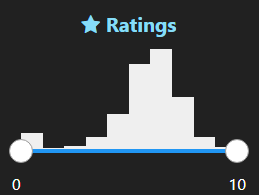
<RangeSlider
  componentId='RangeSlider'
  dataField='vote_average'
  className='review-filter'
  tooltipTrigger='hover'
  range={{
    start: 0,
    end: 10,
  }}
  rangeLabels={{
    start: "0",
    end: "10",
  }}
  react={{
    and: [
      "mainSearch",
      "results",
      "language-list",
      "date-Filter",
      "genres-list",
      "vote-average-list",
    ],
  }}
  showHistogram
/>
Here, we are passing range prop as an object with start and end keys. You can learn more about it here.
Component #4: MultiDataList
MultiDataList will help us make a UI a language-based filter.
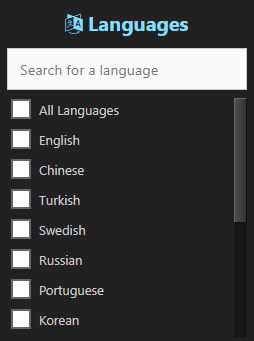
<MultiDataList
  componentId='language-list'
  dataField='original_language.keyword'
  className='language-filter'
  size={100}
  sortBy='asc'
  queryFormat='or'
  selectAllLabel='All Languages'
  showCheckbox={true}
  showSearch={true}
  placeholder='Search for a language'
  react={{
    and: [
      "mainSearch",
      "results",
      "date-filter",
      "RangeSlider",
      "genres-list",
      "vote-average-list",
    ],
  }}
  data={[
    {
      label: "English",
      value: "en",
    },
    {
      label: "Chinese",
      value: "zh",
    },
    {
      label: "Turkish",
      value: "tr",
    },
    {
      label: "Swedish",
      value: "sv",
    },
    {
      label: "Russian",
      value: "ru",
    },
    {
      label: "Portuguese",
      value: "pt",
    },
    {
      label: "Korean",
      value: "ko",
    },
    {
      label: "Japanese",
      value: "ja",
    },
    {
      label: "Italian",
      value: "it",
    },
    {
      label: "Hindi",
      value: "hi",
    },
    {
      label: "French",
      value: "fr",
    },
    {
      label: "Finnish",
      value: "fi",
    },
    {
      label: "Spanish",
      value: "es",
    },
    {
      label: "Deutsch",
      value: "de",
    },
  ]}
  showFilter={true}
  filterLabel='Language'
  URLParams={false}
  innerClass={{
    label: "list-item",
    input: "list-input",
  }}
/>
In contrast to MultiList, we also pass a data prop to MultiDataList which is used for displaying the filter options. You can learn more about MultiDataList over here.
Component#5: DateRange
We will use the DateRange component to create a filter for movie release dates.
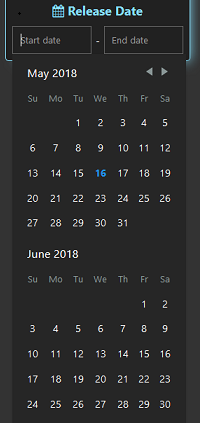
<DateRange
  componentId="date-filter"
  dataField="release_date"
  className="datePicker"
/>
In DateRange, we will just be passing the obvious props. It goes without saying that the dataField prop for DateRange expects a field of Date type. You can learn more about the DateRange component over here.
In addition to the above code sandbox, you can also try the code so far directly from our GitHub repo — https://github.com/appbaseio-apps/MovieSearch-app/tree/step-2.
Step 3: Styling the components we have so far
Now that we have added all the filter components with the SearchBox component, it’s time to style them!
We are using the majority of styling for setting the layout. We will use flex to design our layout. We will create a leftbar div, which will contain all of our filter components. Also, we have added styles for the top navigation bar, which contains the SearchBox component. We have used innerClass property of each component to style the inner parts of it.
You can copy the CSS styles from here and add them to App.css and import them in your App.js with a import './App.css' statement along with our other imports. That’s all!
In addition to the code sandbox above, you can also try the code so far directly from our GitHub repo — https://github.com/appbaseio-apps/MovieSearch-app/tree/step-3.
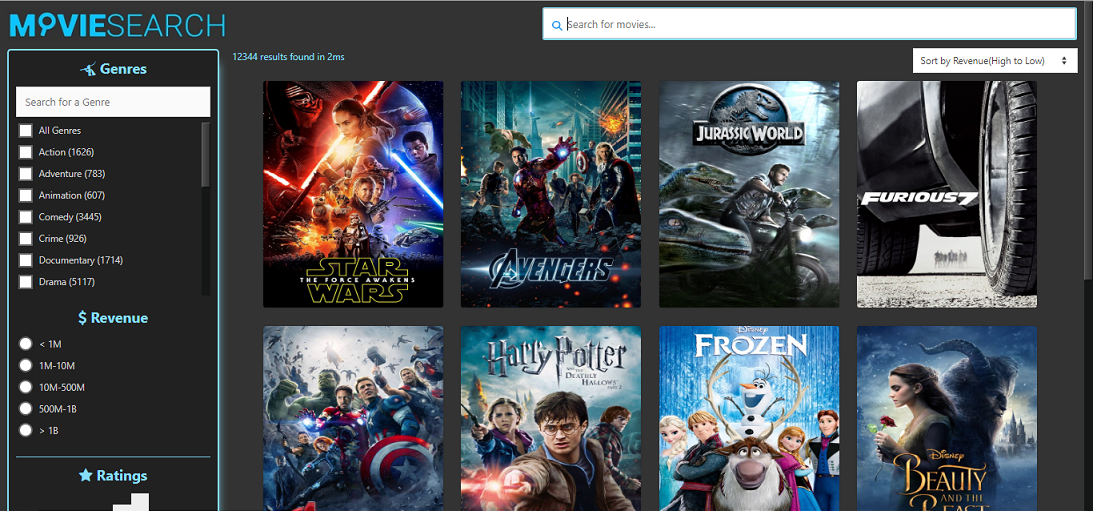
Step 4: Adding ReactiveList component and making our app responsive
Component#7: ReactiveList
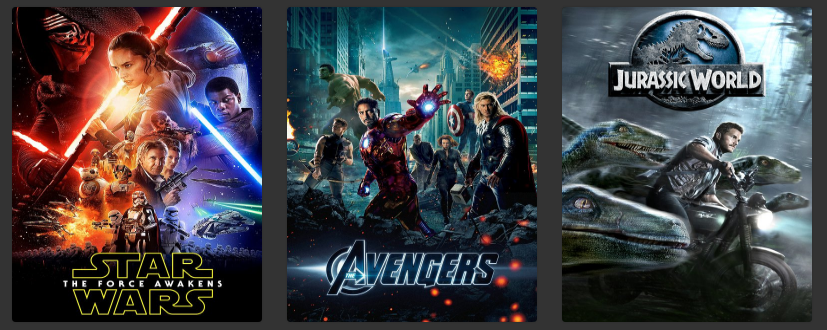
And finally, we will use the ReactiveList component to show the movies that match our search and filters in a fancy card-based view.
<ReactiveList
defaultQuery={() => ({ track_total_hits: true })}
componentId='results'
dataField={[
{ field: "original_title", weight: 3 },
{ field: "original_title.search", weight: 2 },
]}
react={{
and: [
"mainSearch",
"RangeSlider",
"language-list",
"date-filter",
"genres-list",
"vote-average-list",
],
}}
pagination={true}
className='Result_card'
paginationAt='bottom'
pages={5}
size={12}
Loader='Loading...'
noResults='No results were found...'
sortOptions={[
{
dataField: "vote_count",
sortBy: "desc",
label: "Sort by vote-count(High to Low) \u00A0",
},
{
dataField: "popularity",
sortBy: "desc",
label: "Sort by Popularity(High to Low)\u00A0 \u00A0",
},
{
dataField: "vote_average",
sortBy: "desc",
label: "Sort by Ratings(High to Low) \u00A0",
},
{
dataField: "original_title.raw",
sortBy: "asc",
label: "Sort by Title(A-Z) \u00A0",
},
]}
innerClass={{
title: "result-title",
listItem: "result-item",
list: "list-container",
sortOptions: "sort-options",
resultStats: "result-stats",
resultsInfo: "result-list-info",
poweredBy: "powered-by",
}}
>
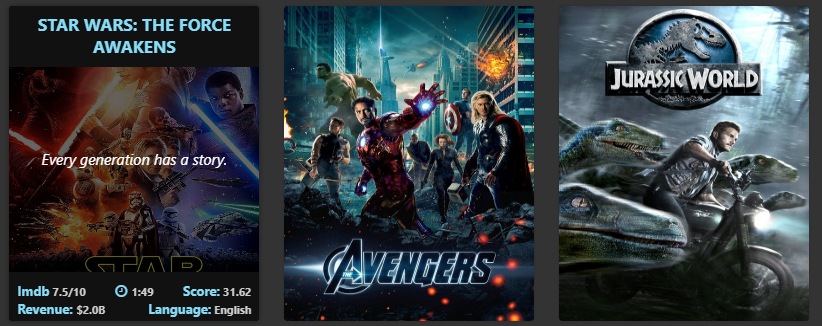
{({ data }) => (
<ReactiveList.ResultCardsWrapper style={{ margin: "8px 0 0" }}>
{data.map((item) => (
<div style={{ marginRight: "15px" }} className='main-description'>
<div className='ih-item square effect6 top_to_bottom'>
<a
target='#'
href={"https://www.google.com/search?q=" + item.original_title}
>
<div className='img'>
<img
src={item.poster_path}
alt={item.original_title}
className='result-image'
/>
</div>
<div className='info colored'>
<h3 className='overlay-title'>{item.original_title}</h3>
<div className='overlay-description'>{item.overview}</div>
<div className='overlay-info'>
<div className='rating-time-score-container'>
<div className='sub-title Rating-data'>
<b>
Ratings
<span className='details'> {item.vote_average}</span>
</b>
</div>
<div className='time-data'>
<b>
<span className='time'>
<i className='fa fa-clock-o' />{" "}
</span>{" "}
<span className='details'>{item.release_date}</span>
</b>
</div>
<div className='sub-title Score-data'>
<b>
Popularity:
<span className='details'> {item.popularity}</span>
</b>
</div>
</div>
<div className='vote-average-lang-container'>
<div className='sub-title language-data'>
<b>
Language:
<span className='details'>
{" "}
{item.original_language}
</span>
</b>
</div>
</div>
</div>
</div>
</a>
</div>
</div>
))}
</ReactiveList.ResultCardsWrapper>
)}
</ReactiveList>
The pagination and paginationAt props determine whether we will use pagination (or an infinite scroll) to display our results and when using pagination, where the position of the pagination component would be at. We have set it to bottom. You can also try passing top or both.

The resultStats prop which will show the number of movies in the result and other statistical information of result. sortOptions will provide options to sort results by their popularity, alphabetic order, and ratings. You can also add more sort options depending on your data. You can learn more about the ReactiveList component over here.
Next, we will make our app responsive so that it looks good in any size of screen. We will use a toggle button for smaller screens so that the user can switch between the results view of movies and the filters view. Here, I have used a state variable isClicked to decide which view should be displayed.
In addition to the code sandbox above, you can also try the code so far directly from our GitHub —https://github.com/appbaseio-apps/MovieSearch-app/tree/step-4.
Step 5: Adding overlay effect on result cards
Now in the final step, we will add a fancy overlay effect on result cards so that users can view the movie information by hovering over them.
In addition to the code sandbox above, you can also try the code so far directly from our GitHub —https://codesandbox.io/s/github/appbaseio-apps/MovieSearch-app/tree/step-5.
If you have been running the setup locally, you can open the app in the browser after applying the above changes:
npm start # open http://localhost:3000
You should see the app running. Now search for your favorite movies and enjoy!
Woohoo!!! We made it! We have made a beautiful MovieSearch App! We went from a boilerplate with CRA to creating a MovieSearch UI, hopefully well within an hour.
Bonus Step: Using SSR with next.js
If you have come this far, ReactiveSearch also allows performing server-side rendering (aka SSR). We will use the next.js library to showcase this!
You can read the following article about the history of SSR with ReactiveSearch and how it enables you to build a blazing fast search UI besides giving some sweet SEO benefits. Blazing fast apps ⚡️ with Reactivesearch
As a first step, install next.js in your project:
npm install --save next
Make sure you add a script to your package.json like this:
{ "scripts": { "dev": "next", "build": "next build", "start": "next start" } }
Usage
First, import initReactivesearch:
import initReactivesearch from '@appbaseio/reactivesearch/lib/server';
Then, evaluate the initial state:
const initialState = await initReactivesearch(...);
and finally, pass the computed initial state to ReactiveBase component.
<ReactiveBase {...props} initialState={initialState}> ...
If you got stuck somewhere, you can check out the details about SSR with ReactiveSearch over here. Now, create a directory named **pages **in your root directory and move all the JS files in it. Create another directory named **static in the **root directory to store our app’s logo and other image files we have used. Change _document.js file as it is mentioned in the above link.
And we are done! Just run this command:
npm run dev
And you will see the MovieSearch app with fast rendering at http://localhost:3000. Try to refresh the page to see the effect of next.js.
In case you are missing a step, you can get the code so far by following these:
> git clone https://github.com/appbaseio-apps/MovieSearch-app.git
.
.
.
> cd moviesearch
> npm install && npm run dev
# open http://localhost:3000
Summary
Here comes the end of our journey and we have got our awesome MovieSearch app built with ReactiveSearch. To summarize our journey:
This post introduces Elasticsearch and ReactiveSearch — A UI components library written in React for building search UIs. We jump through the hoops in a step-by-step manner to build our app.
**Step 1: **Base setup of CRA with ReactiveSearch (Codesandbox link: step1)
**Step 2: **Setup with SearchBox and all the filter components from ReactiveSearch (Codesandbox link: step2)
**Step 3: **Styling the components we have so far (Codesandbox link: step3)
**Step 4: **Adding ResultCard component and making our app responsive (Codesandbox link: step4)
**Step 5: **Adding overlay effect on result-cards (Codesandbox link: step5)
Using about 8 components, we were able to build a nice-looking MovieSearch UI!
In the bonus step, we add SSR using next.js to enable a faster first paint (almost instantaneous) along with getting some sweet SEO benefits when running the app in a production setting.
Useful References
All ReactiveSearch components can be interactively tried using the playground https://opensource.appbase.io/playground/.
The documentation for all the above plus 20 other components is available at https://docs.appbase.io/.
You can look at the code for this app at https://github.com/appbaseio-apps/MovieSearch-app