

KNN Search with OpenSearch and OpenAI Embeddings: An In-Depth Guide
In this post, we use OpenSearch and OpenAI to build a KNN search UI with ReactiveSearch


K-nearest neighbors (KNN) search aka semantic search is a simple and intuitive algorithm although if you haven't used them, the topic can seem daunting. In this blog post, we will go from no familiarity to KNN to building a full functional backend and search UI - using OpenSearch for the search engine, OpenAI for vector embeddings and ReactiveSearch for cloud hosting of the backend and the search UI components. KNN search is a very useful algorithm that can be used for a variety of tasks, such as clustering data, building recommendation systems, etc. Some examples of it are below:
Improve search results:
KNN Search can be used to improve traditional search results by providing more relevant and accurate results to users. This can be particularly useful when searching for information whose meaning is difficult to describe in words. For example, if a user searches "Not good dog food", then traditional search might show results containing "good dog food" which is opposite to the user's intention.
Recommend items:
It can be used to recommend items to users based on their preferences or behavior. For example, a recommendation system might use similarity search to find items that are similar to those that a user has previously purchased or viewed.Categorizing data into clusters:
KNN search can group similar items together, allowing us to identify patterns and relationships in the data. For example, an e-commerce company might use clustering to group customers based on their purchase behavior. Customers who frequently purchase items in a specific category or price range can be grouped together in a cluster, while customers who tend to make one-time purchases can be grouped in a different cluster. The company can then create targeted marketing campaigns for each cluster, such as offering discounts or promotions on items that are popular within a particular cluster.
Visualizing data as a vector space
Before we implement KNN Search we need to understand a fundamental concept on which it is built, "vectors". Vectors are simply arrays. While in programming we can have arrays of strings, objects, etc., vectors can contain only numeric values like [2, 3]. Hence vectors are numeric arrays. The cool part about vectors is that we can plot them on a graph and find distance between them and see how close one is to another.

We can't plot text or audio information on graph or can we? What if we transform the textual data to a vector. That is essentially what a machine learning model does. It takes real world objects like text, audio, etc. and generates a vector. A collection of vectors is called a vector space. You can see the space of sentences below:
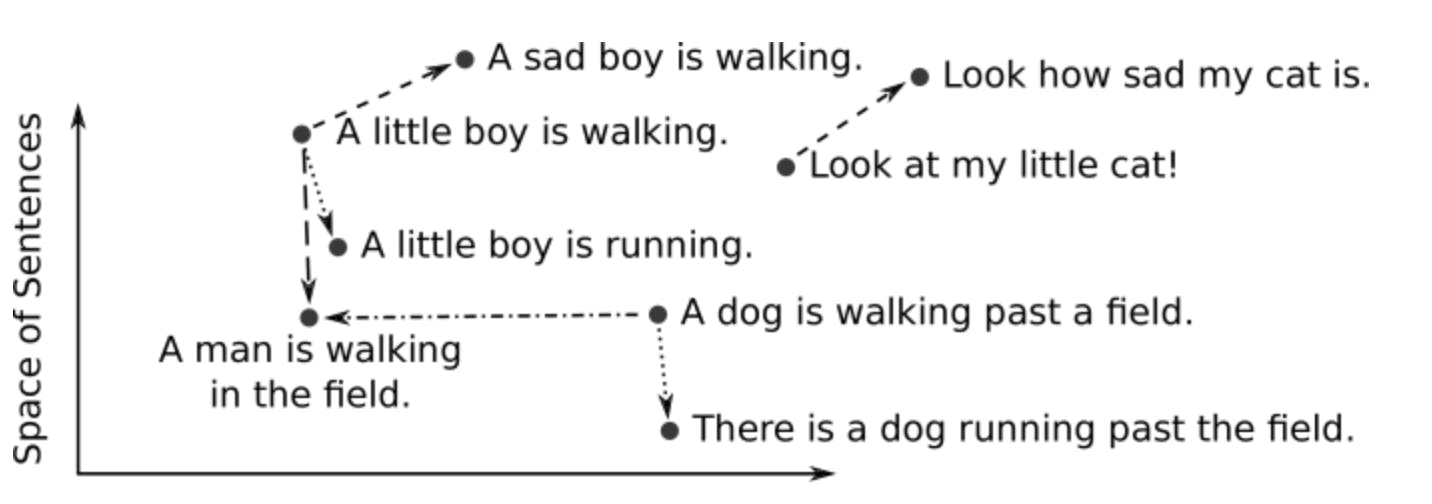
Above is a 2 dimensional graph. Adding more dimensions to the vector means nearest points get more similar. A real world model can map data to thousands of dimensions.
What are we building?
We are going to build a search UI for a dataset of Amazon reviews of various products. This search wouldn't be a traditional search, but would show a user similar results. For example, if a user searches "Not good dog food", then traditional search might show results containing "good dog food" which might not be the intention. But KNN search would show similar results like "bad dog food" because it maps the two queries as nearest neighbours.
The Building Blocks
OpenAI Vector Embeddings API: Model for vectorizing data
We would use this API to convert our textual review data into vectors. You would need an API key to access the Embeddings API. You can do that by going to the OpenAI website and signing up.
OpenSearch: Search index
We use a search index that has the capability of performing a KNN search on vectors. For this, we will use an OpenSearch index because it doesn't have limitations as opposed to other search indexes.
💡 Note: ElasticSearch has a vector dimension limitation. This means the vector array in ElasticSearch can have a maximum length of
1024but OpenAI vectors need an array of1536length. Read more about this limitation in ElasticSearch on this open issue.
Update: The issue looks addressed now and as Elasticsearch releases a new version addressing this limitation, we will be publishing a tutorial on the same using Elasticsearch.
Reactivesearch: The Catalyst
We have all the tools but we need the infrastructure to make the above pieces work with each other without you having to do any work. Reactivesearch.io provides hosting an OpenSearch index but you can also "Bring Your Own Cluster"(BYOC). We would also use a feature called pipelines which helps in organizing various steps like vectorizing data, indexing it, etc. into stages. This makes the process of developing such an application highly efficient. Reactivesearch also has a UI library which we would use to build the app.
Let's dive into code
We are going to use Reactivesearch.io pipelines to build this app. If you are unfamiliar with it, then you can read it in the documentation. In short, they help us to perform operations on data in various stages. The results can then be sent through as response to the front end.
Indexing pipeline:
Creating and configuring index:
First, we would need to create an index with vectorized data of our product reviews. We would do so by using an indexing pipeline. First things first, we would need to create an index named amazon_reviews. The index also needs to be created such that it is aware of the vectorized form of the data which is later going to be used for KNN search. We specify the field type as knn_vector and also have additional settings. Also, note that the field name is vector_data which would be referenced later when we build the frontend app. You can look at below curl script which you can run from the terminal with reactivesearch_cloud_url of your cluster. We would also need the index.
curl --location --request PUT 'https://{{reactivesearch_cloud_url}}/amazon_reviews' \
--header 'Content-Type: application/json' \
--data-raw '{
    "settings": {
        "knn": true,
        "knn.algo_param.ef_search": 100
    },
    "mappings": {
        "properties": {
            "vector_data": {
                "type": "knn_vector",
                "dimension": 1536,
                "method": {
                    "name": "hnsw",
                    "space_type": "cosinesimil",
                    "engine": "nmslib"
                }
            }
        }
    }
}'
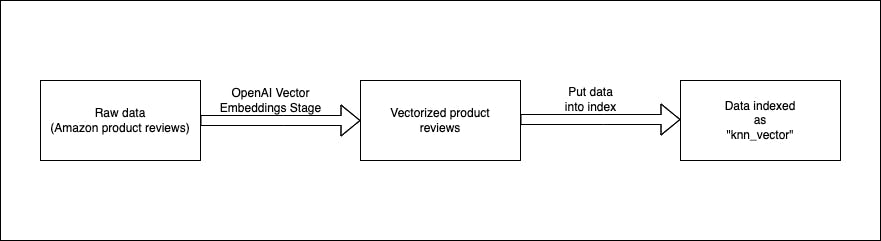
Anatomy of pipeline:
We need a pipeline to first convert the raw product data into vector form. Then, we can take that data and index as knn_vector in search index. This would make us ready to perform KNN search.
Here is what our pipeline looks like in a config file. If you don't know how to setup an indexing pipeline using Reactivesearch.io you can follow the documentation. You can paste the below in the pipeline editor and it would convert itself to JSON config. You would need to paste OpenAI api key in envs field to make the pipeline work.
We want to vectorize to text data fields Text and Summary and we specify that in the stage.
Notice that we mention the output_key as vector_data. This is the field where the text information would be stored as vectors.
enabled: true
description: Index pipeline to store vectorized data
routes:
  - path: /amazon_reviews/_doc
    method: POST
    classify:
      category: elasticsearch
      acl: index

envs:
  openAIApiKey: ${{ OPENAI_API_KEY }}

stages:
- id: authorize user
  use: authorization
- id: fetch embeddings
  use: openAIEmbeddingsIndex
  inputs:
    apiKey: "{{openAIApiKey}}"
    inputKeys:
    - Summary
    - Text
    outputKey: vector_data
  continueOnError: false
- id: index data
  use: elasticsearchQuery
  needs:
  - fetch embeddings
Indexing data:
Once the pipeline is deployed at the above endpoint we can index the data. We have created a script to index data. You can follow the steps after creating the above indexing pipeline.
Search pipeline:
We just indexed our textual data (product reviews) inside the index. But when the user performs a search it is still text and not a vector. Hence we can't perform a KNN search without vectorizing the query value. Also, we shouldn't index the search query using the index pipeline because the search query isn't a product review and would be different each time. Instead, we create a new pipeline which transforms the search query using the OpenAI embedding into a vector and then gives it to the search index to perform KNN search.
Config of the pipeline looks like below.
enabled: true
routes:
- path: "/amazon_reviews/_reactivesearch"
  method: POST
  classify:
    category: reactivesearch

envs:
  openAIApiKey: ${{ OPENAI_API_KEY }}

stages:
- id: authorize user
  use: authorization
- id: fetch embeddings
  use: openAIEmbeddings
  inputs:
    apiKey: "{{openAIApiKey}}"
    useWithReactiveSearchQuery: true
  continueOnError: false
- use: reactivesearchQuery
  needs:
  - fetch embeddings
  continueOnError: false
- use: elasticsearchQuery
  continueOnError: false
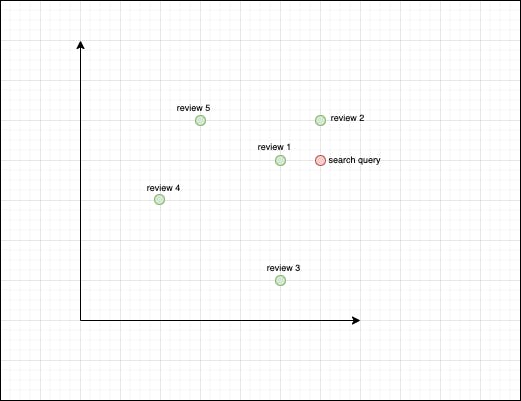
Below shows a diagram of what might happen in the search phase. We already have the reviews inside the index(Green dots). We get the search query from the user and vectorize it and provide it to the search index, which maps it near to some reviews in the vector space (review 1 and 2). Those are the nearest neighbours and the results sent back to the user would reflect it i.e. Review 1 and 2 would be ranked higher, and would appear before other reviews. Note that we don't index the search query vector. It is temporary and would not be present in the next search.
Building the UI:
All the code we are going to show is present inside knn-search-demo github repo. We also would like you to go through the quick start guide of the Reactivesearch UI library to get some familiarity. The guide will not only show how to set up a boilerplate react app but also how to setup @appbaseio/reactivesearch library. We would primarily modify the src/App.jsx file and would be using ReactiveBase, SearchBox, and ReactiveList which the quick start guide already covers.
Connecting to the search pipeline:
In order to send the search query to the pipeline and getting results back we would need to establish a connection with it. We do it by using the endpoint property available on ReactiveBase. You would be able to get the credentials from dash.reactivesearch.io. Also, note that you would have to set reactivesearchAPIConfig.recordAnalytics to false.
import React from "react";
import {
  ReactiveBase,
} from "@appbaseio/reactivesearch";

function Main() {
  const HOST_URL = "https://{{user}}:{{password}}@{{host}}/amazon_reviews/_reactivesearch"

  return (
    <ReactiveBase
      endpoint={{
        url: HOST_URL,
        method: "POST",
      }}
      reactivesearchAPIConfig={{
        recordAnalytics: false,
        userId: "jon",
      }}
    >
      {/* Search and ReactiveList component go here */}
    </ReactiveBase>
  );
}

const App = () => <Main />;

export default App;
Adding search and result component:
In our dataset, there are two fields in which we are mainly interested, Summary and Text. Summary is a short description of the whole review(Text).
We would keep the dataField as Summary inside the Searchbox. This would be used in showing suggestions matching the search query (this would not be KNN search, rather a regular search). We would also control the value of the SearchBox component by using value and onChange props. This would be used later when we transform the normal search request. We also use debounce which fetches suggestions only after an interval when the user has stopped typing.
// src/App.jsx
function Main() {
  const [searchValue, setSearchValue] = useState("");

  return (
    <ReactiveBase
      {...configProps}
    >
      <SearchBox
        dataField={["Summary"]}
        componentId="SearchComponent"
        size={5}
        showClear
        value={searchValue}
        debounce={SUGGESTION_DEBOUNCE_DELAY}
        onChange={(value) => {
          setSearchValue(value);
        }}
      />
    </ReactiveBase>
  );
}
Next, we would add a component to show the results, ReactiveList. Make sure to set the react property to the componentId value of the SearchBox component, i.e. "SearchComponent". We can then use the render prop to customize the look and feel of the results.
function Main() {
  const [searchValue, setSearchValue] = useState("");

  return (
    <ReactiveBase {...configProps}>
      <ReactiveList
        componentId="SearchResult"
        dataField="Summary"
        size={12}
        pagination
        react={{ and: "SearchComponent" }}
        render={({ data }) => {
          return (
            <div className="mx-5 my-2">
                {data.map((item) => (
                  <div>
                    <h1>{item["Summary"]}</h1>
                    <p>{item["Text"]}</p>
                  </div>
                ))}
            </div>
          );
        }}
      />
    </ReactiveBase>
  );
}
Transforming the request:
Before we transform the request, we need to have several clarifications regarding when the network requests are performed and which network requests are performed.
Suggestion query: When the user types into the
SearchBoxand doesn't hit enter, he sees a list of suggestions. Those suggestions are fetched by performing a network request whosetypeissuggestion. This query is debounced such that it fires only after an interval the user stops typing in theSearchBoxand can be controlled by passing a numeric value todebounceprop.Search query: When the user hits Enter or selects a suggestion then a query of
typesearchis fired. The search query is fired for both the components,SearchBoxandReactiveList. We can identify the component for which the query by looking atidproperty of the query. Thisidmatches with thecomponentIdof the specified component.
Now we are all set to transform network requests. Our search pipeline works if we provide a query of type search with a vectorDataField which we indexed earlier. We also need to provide a value which is the search query that would be vectorized and used for performing the KNN search. Rough structure of component queries is as below:
{
    "query": [
        {
            "id": "search",
            "type": "search",
            "dataField": [
                "Text",
                "Summary"
            ],
            "vectorDataField": "vector_data",
            "value": "good dog food",
            "excludeFields": [
                "vector_data"
            ]
        }
    ]
}
We can transform the network request by specifying a prop on ReactiveBase called transformRequest.
We would change only the query of type search and would augment it with vectorDataField and value of the search query. Here we would use the controlled value of the search component.
function Main() {
  const [searchValue, setSearchValue] = useState("");

  return (
    <ReactiveBase
      {...otherConfigProps}
      transformRequest={(req) => {
        const body = JSON.parse(req.body);
        // Transform query
        body.query = body.query.map((componentQuery) => {
          if (
            componentQuery.id === "SearchComponent" &&
            componentQuery.type === "search"
          ) {
            return { ...componentQuery, vectorDataField: "vector_data" };
          }
          if (
            componentQuery.id === "SearchResult" &&
            componentQuery.type === "search"
          ) {
            const searchQuery = body.query.find(
              (q) => q.id === "SearchComponent" && q.type === "search"
            );
            const searchValue = searchQuery.value;
            delete componentQuery.react;

            return {
              ...componentQuery,
              vectorDataField: "vector_data",
              value: searchValue,
            };
          }
          return componentQuery;
        });
        body.settings = {
          recordAnalytics: true,
          backend: "opensearch",
        };

        const newReq = { ...req, body: JSON.stringify(body) };
        return newReq;
      }}
    >
    </ReactiveBase>
  );
}
Finishing Up
Putting all of the above together and styling the app we would get a complete app below. We also add a few sample queries which can be used to perform search. Since the value of SearchBox is controlled, it is easy to make it possible. You can browse the codesandbox below. All the code is primarily present in src/App.jsx.
Summary
In this blog post, we discuss the implementation of K-nearest neighbors (KNN) search to improve search results, recommend items, and categorize data into clusters. We explain the concept of vector spaces and how they relate to KNN search. We then dive into the implementation of a search UI for a dataset of Amazon reviews, utilizing OpenAI's Vector Embeddings API, OpenSearch as the search engine backend, and ReactiveSearch for cloud hosting of OpenSearch and to build the UI for the app. We provide code examples and explanations for each step of the process, including indexing pipelines, search pipelines, and building the UI with ReactiveSearch components. Finally, we show how to transform the network request to complete the app.