# How to build a geo search UI with React and Elasticsearch
In this post, I will show how to build a geo search web app using React and Elasticsearch. I will use an Airbnb dataset to build an Airbnb like search experience that includes a autocomplete searchbox, facets and a maps and results navigation with pagination support. Using the principles of this post, you will be able to build any kind of geo search application.
Alright, alright, alright. I heard [you like React](https://2021.stateofjs.com/en-US/libraries/front-end-frameworks/) and Airbnb, but what is this Elasticsearch thing I’m talking about. Don’t worry. This blog post will give you a kickstart into understanding the basics of Elasticsearch — What is it? Why should you care about it? And, how can you use it with React to build powerful apps painlessly?
# You should try out the to see what we will be building. I will wait for you!
.
.
.
.
.
**What is Elasticsearch and why should you care about it?**
Now, let’s understand the role of Elasticsearch in helping us build the above UI. Elasticsearch is a *super-fast, open-source, full-text search engine*. It allows you to **store**, **search**, and **analyze** big volumes of data quickly (we are talking milliseconds here). It is generally used as the underlying engine/technology that powers applications that have complex search features and requirements. You can read more about it [here](https://www.elastic.co/guide/en/elasticsearch/reference/current/getting-started.html).
With Elasticsearch, you can build a fast search utilizing its powerful Query DSL. However, setting up Elasticsearch correctly requires a lot of work. For instance, the data mapping, analyzers and tokenizers need to be set correctly or you may not receive accurate search results back. Besides, the more filters that get applied along with the search query, the more complex the resulting search query becomes.
We, at Appbase, have built some open-source tools to help you do all these things with the matter of some clicks.
- A tool to **add data** into Elasticsearch — [Importer](http://importer.appbase.io/)
- A tool to **view Elasticsearch data** like an excel sheet — [Data Browser](https://dejavu.appbase.io/)
- A tool to **generate relevant Elasticsearch queries** easily — [Query Builder](https://opensource.appbase.io/mirage/)
- Searchbox UI component library for React, Vue, Vanilla JS (as well as for Angular, Svelte), React Native and Flutter - [Searchbox](https://opensource.appbase.io/searchbox)
In this blog post, with the help of some of these toolings, we will utilize the strengths of Elasticsearch with React to build powerful apps.
**How to use Elasticsearch with React?**
We will be using [ReactiveSearch](https://github.com/appbaseio/reactivesearch) and [ReactiveMaps](https://github.com/appbaseio/reactivemaps) open-source libraries to build the Airbeds app in this post. These libraries offer a range of highly customizable rich UI components that can connect with any Elasticsearch server and provide you with an appropriate default search query for all generic use-cases (like E-commerce, Yelp, Meetups, etc) bundled into these components. ReactiveSearch will help us to build UI widgets for filters and search-related UI elements. ReactiveMaps will provide us with the UI widgets for Map related UI elements.
> ReactiveMaps is currently featured on Product Hunt. 🎉 🎉
>
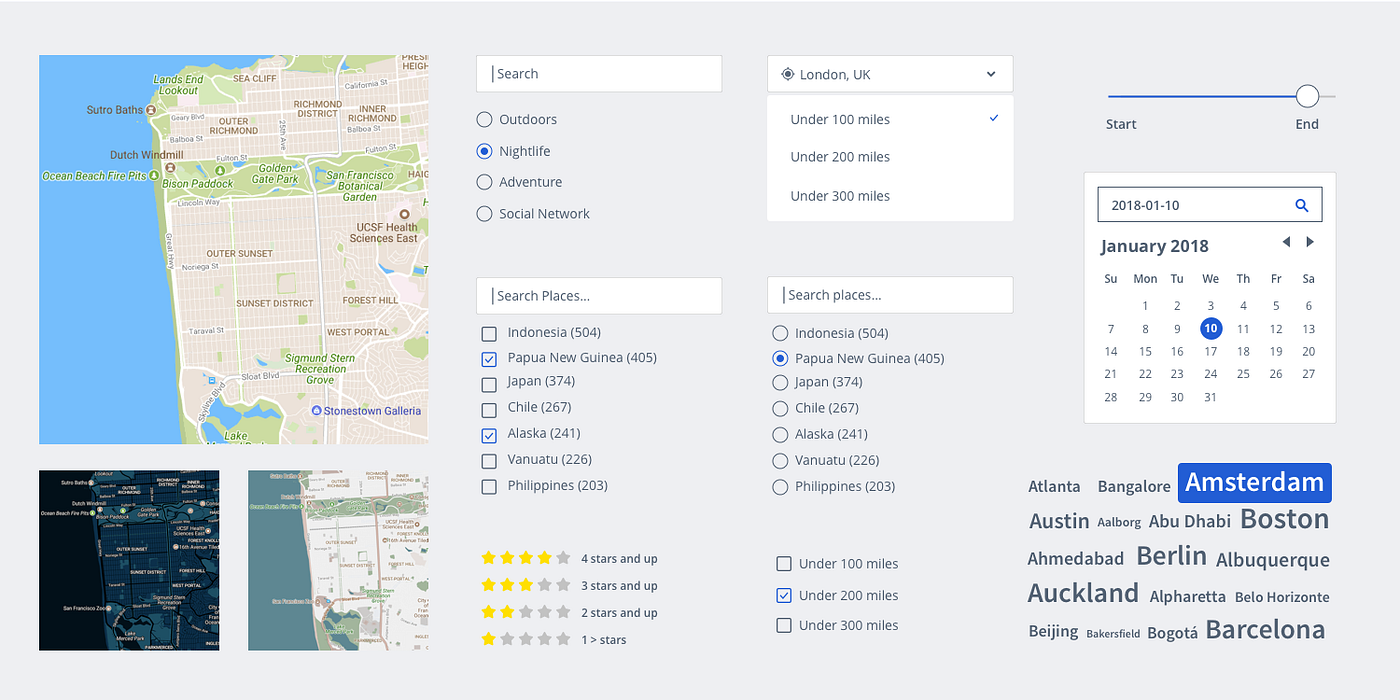
**Image:** A sneak peeks into the UI components offered by ReactiveSearch and ReactiveMaps.
# **Things we will need**
In order to build Airbeds application, we will need a set of things before we get started with writing actual code:
- **Dataset for Airbeds App:**
To make a great UI we should have a good dataset. We found an awesome dataset for our App.
Here is the link to a dataset: [https://www.kaggle.com/airbnb/seattle](https://www.kaggle.com/airbnb/seattle).
- **Elasticsearch hosting:**
You can set up and install an Elasticsearch server by following the [official installation guide](https://www.elastic.co/guide/en/elasticsearch/reference/current/install-elasticsearch.html), or you can create a free account at [appbase.io](https://appbase.io/) which provides Elasticsearch hosting as a service and is easy to use. For simplicity, we will be using appbase.io service to get started.
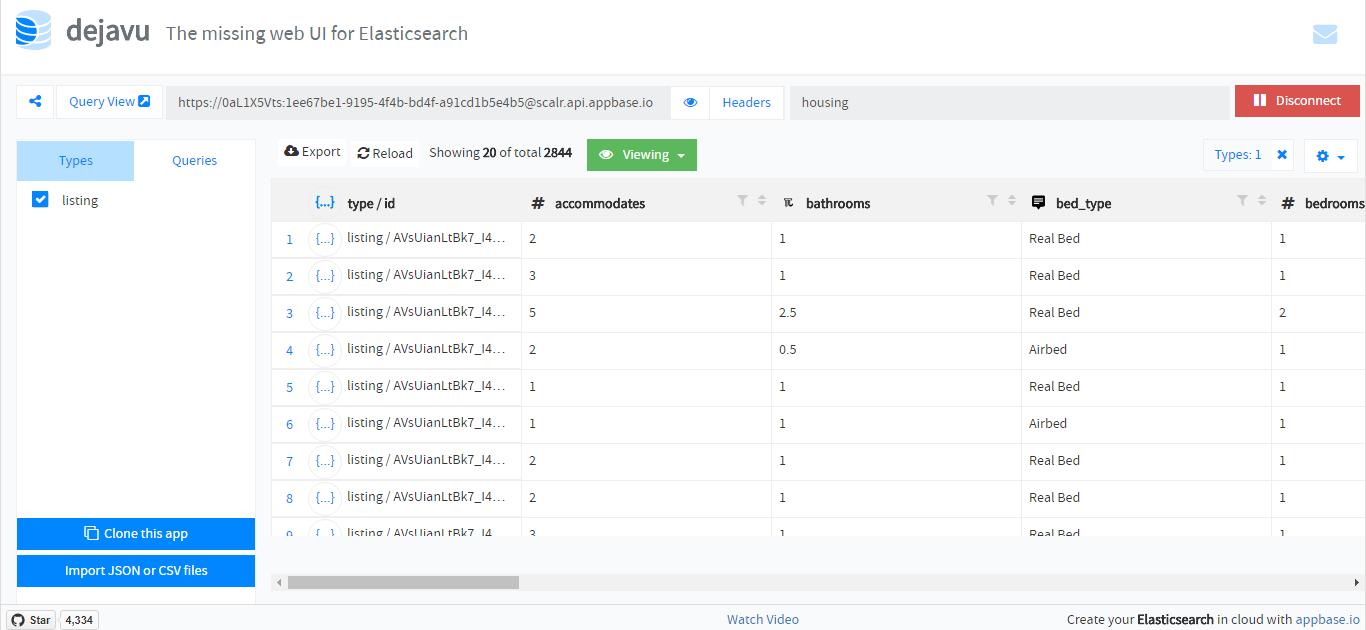
I’ve already created an appbase app with Airbeds dataset. You can check out the cleaned-up dataset from above [over here in the data browser tool Dejavu](https://dejavu.appbase.io/?appname=clone-airbeds&url=https://73afb5484d0e:26bd5cb0-1afc-4e19-8870-4a2eda8d0b56@appbase-demo-ansible-abxiydt-arc.searchbase.io), which is built by Appbase.io:
**Image:** Tap on the image to view the hosted Elasticsearch dataset for our app.
[](https://dejavu.appbase.io/?appname=clone-airbeds&url=https://73afb5484d0e:26bd5cb0-1afc-4e19-8870-4a2eda8d0b56@appbase-demo-ansible-abxiydt-arc.searchbase.io)
The credentials for accessing the above app programmatically are:
```sh
url="https://73afb5484d0e:26bd5cb0-1afc-4e19-8870-4a2eda8d0b56@appbase-demo-ansible-abxiydt-arc.searchbase.io"
# read-only
```
Now, we will go step by step to build our application. We’ll use [Codesandbox.io](https://codesandbox.io/). So, you can be with me during the whole journey and see the step-by-step progress of our application as we build it. Click on the above link and click on the `Open React` button.

# **Step 1: Base setup for CRA with ReactiveSearch and ReactiveMaps**
If you have tried out the [Create React App](https://github.com/facebookincubator/create-react-app) before, you will feel right at home as we build this app.
**Create React App**
Initialize the CRA setup. We will use `npm` as the package manager, you can also use `yarn` instead.
```
npx create-react-app airbeds
cd airbeds
npm start
```
> Note: npx comes with npm 5.2+ and higher, see instructions for an older release here.
>
Go grab a coffee and be back in a couple of minutes … The setup will be ready for you!

One of the great benefits of using CRA is that it works without requiring to set up a build configuration.
At this point, you should have a directory structure similar to this:
```
airbeds
├── README.md
├── node_modules
├── package.json
├── .gitignore
├── package-lock.json
├── public
│ └── favicon.ico
│ └── index.html
│ └── manifest.json
└── src
└── App.css
└── App.js
└── App.test.js
└── index.css
└── index.js
└── logo.svg
└── registerServiceWorker.js
```
Next, we will install the [`reactivesearch`](https://www.npmjs.com/package/@appbaseio/reactivesearch) and [`reactivemaps`](https://www.npmjs.com/package/@appbaseio/reactivemaps) npm packages.
**Install ReactiveSearch**
```
npm install @appbaseio/reactivesearch
```
**Install ReactiveMaps**
```
npm install @appbaseio/reactivemaps
```
# **Step 2: Adding components from ReactiveSearch library**
## **Adding the first ReactiveSearch component: ReactiveBase**
All the ReactiveSearch components are wrapped inside a container component — `ReactiveBase` which glues the Elasticsearch index and the ReactiveSearch components together. We’ll use this in `/src/index.js`:
The `app` and `credentials` are taken from my appbase.io app. You can create your own app and add those from your [dashboard](https://dashboard.appbase.io/).
We can set our app’s theme by providing the `theme` attribute `prop` to our ReactiveBase component. Here is the `theme` for our app:
Now let’s start the server with `npm start`.
## **Breaking Down The Airbeds App**
Now that we have a dataset to play around with and we are also done with our setup, it’s time for adding components in our app.
Before you add the below snippets to the `render()` method, you should also remember to import them using the following format:
`import { Component#1, Component#2 } from @appbaseio/reactivesearch`
## **SearchBox Component**
[`SearchBox`](https://docs.appbase.io/docs/reactivesearch/v3/search/searchbox/) component creates a search bar UI which allows us to search for available rooms.
In this component, we are passing the `dataField` parameter with the `name` value. Here, `name` is the column in the database on which we want to apply our search. You can learn more about this component [here](https://docs.appbase.io/docs/reactivesearch/v3/search/searchbox/).
# **Step 3: Adding components from ReactiveMaps and styling them**
Now to test that our `SearchBox` component actually works lets add a component to display results. We are going to use a map.
We will import components from ReactiveMaps library using this statement:
```
import { ReactiveGoogleMap } from '@appbaseio/reactivemaps';
```
[`ReactiveGoogleMap`](https://docs.appbase.io/docs/reactivesearch/v3/map/reactivegooglemap/) component provides a map as a data-driven layer. One can add marker pins, show popovers, draw polygons, build navigation routes based on the results from the ReactiveSearch components. In our current app, we will display the available accommodations based on the search and filters onto the map view. Interesting! Isn’t it?
In this component, `defaultZoom` attribute defines the map’s zoom level and accepts integer values between [0, 20]. We can also provide style to ReactiveMap component with the `style` prop. The `innerClass` attribute helps us to provide className for inner components of ReactiveMap. `render` attribute is used for showing result cards for user’s search. We have designed our result-cards using `flex.` We will show markers on the map with using `renderItem` parameter. You can know more about this component [here](https://docs.appbase.io/docs/reactivesearch/v3/map/reactivegooglemap/).
Wohoo!!! We have made working Airbeds app! But still, we will add more styles to make it look cooler and professional!
# **Step 4: Adding Facets/Filters**
## **1: RangeInput Component**
[`RangeInput`](https://docs.appbase.io/docs/reactivesearch/v3/range/rangeinput/) will be used to create the price filter which allows a user to filter accommodations based on their budgets.
In this component, we are passing the `range` attribute, which will define the start and end value of our filter. We can set the labels with `rangeLabels` parameter. We have set default values of start and end price as 10$ and 20$ respectively. `range` parameter shows the list of components, with RangeInput component has to change reactively. You can learn more about this component [here](https://docs.appbase.io/docs/reactivesearch/v3/range/rangeinput/).
## **2: NumberBox Component**
[`NumberBox`](https://docs.appbase.io/docs/reactivesearch/v3/range/numberbox/) will help us to make UI widget for Guests filter, which allows a user to filter properties by the number of guests that can be accommodated.
Here, `data` parameter defines the maximum and minimum value for the NumberBox component. You can learn more about this component [here](https://docs.appbase.io/docs/reactivesearch/v3/range/numberbox/).
## **3. DateRange Component**
[`DateRange`](https://docs.appbase.io/docs/reactivesearch/v3/range/daterange/) will provide UI widget for Date filter, which allows a user to select a range of dates for accommodation.
Here, the `numberOfMonths` attribute shows the number of months to be shown in the calendar view. `initialMonth` sets the initial visible month when the calendar UI is opened. You can learn more about this component [here](https://docs.appbase.io/docs/reactivesearch/v3/range/daterange/).
After adding all the three components the app should look like below.
# **Step 5: Styling the components we have so far**
Alright, Alright, Alright !!! I got it! You must be thinking that why these components look so simple. Let’s add some styles to them.
We are using the majority of styling for setting layout. We have used `flex` to design our layout. We have used buttons for each filter. We will show particular filters when the user hovers on particular buttons. Add styles in App.css file and add this statement in index.js file:
```
import "./App.css";
```
# **Step 6: Adding the popover effect on markers**
Now in the final step #5, we will add a popover effect on markers so that when a user clicks on the marker, we can show them more details. Let’s do it!
We will use `onPopoverClick` attribute of ReactiveGoogleMap component to achieve this. The return value here is a valid JSX markup, giving you full control over what can be displayed within it. This is how my `onPopoverClick` function looks:
# **Step 7: Show selected filters**
In order to show which filters are applied we can use [`SelectedFilters`](https://docs.appbase.io/docs/reactivesearch/v3/advanced/selectedfilters/) component.
Congrats! If you have followed along so far, you should see a fully working Airbeds app, just as you saw at the start of the post! 🎉
In case you are missing a step, you can get the code so far by following these:
```sh
git clone https://github.com/appbaseio-apps/Airbeds-app.git
cd airbeds
npm install
npm run dev
# open http://localhost:3000
```
# **Summary**
Here comes the end of our journey, and we have got our awesome Airbeds app built with ReactiveSearch and ReactiveMaps. To summarize everything so far:
This post introduces [ReactiveSearch](https://docs.appbase.io/) and [ReactiveMaps](https://docs.appbase.io/reactivemaps/) — UI components libraries for Elasticsearch that provide the scaffolding for building great search experiences. Next, we went step-by-step to add different UI components and style our app.
- **Step 1**: [Base setup for CRA with ReactiveSearch and ReactiveMaps](https://github.com/appbaseio-apps/Airbeds-app/tree/step-2-add-reactivebase)
- **Step 2**: [Adding searchbox](https://github.com/appbaseio-apps/Airbeds-app/tree/step-2-add-searchbox)
- **Step 3**: [Adding Map](https://github.com/appbaseio-apps/Airbeds-app/tree/step-3-add-map)
- **Step 4**: [Adding Facets/Filters](https://github.com/appbaseio-apps/Airbeds-app/tree/step-4-add-daterange)
- **Step 5**: [Styling the components we have so far](https://github.com/appbaseio-apps/Airbeds-app/tree/step-5-styling)
- **Step 6**: [Adding a popover effect on markers](https://github.com/appbaseio-apps/Airbeds-app/tree/step-6-popover)
- **Step 7**: [Show selected filters](https://github.com/appbaseio-apps/Airbeds-app/tree/step-7-selected-filters)
# **Useful References:**
All ReactiveSearch and ReactiveMaps components can be interactively tried using the playground [https://opensource.appbase.io/playground/](https://opensource.appbase.io/playground/).
The documentation for all the above plus 20 other components is available at [https://docs.appbase.io/](https://docs.appbase.io/).
You can look at the code for this app at [https://github.com/appbaseio-apps/Airbeds-app](https://github.com/appbaseio-apps/Airbeds-app).
Finally, go ★ the project on [Github](https://github.com/appbaseio/reactivesearch) so you can find it when you need to build that awesome search!